15 best hobby train diesel locomotives
Hobby train diesel locomotives are miniature, scale-model representations of diesel locomotives that are commonly used in the world of model railroading. These model locomotives are a popular choice among model railroad enthusiasts and collectors due to their versatility, realism, and wide range of available models. Here are some key aspects of hobby train diesel locomotives:
Scale Models: Diesel locomotives in the hobby train world are typically built to a specific scale, such as HO (1:87 scale), N (1:160 scale), or O (1:48 scale). These scales determine the size and proportion of the model in relation to the real-life locomotive.
Realistic Detailing: Hobby train diesel locomotives are known for their attention to detail.They often feature realistic paint schemes, logos, and decals that closely resemble their real-life counterparts. Many enthusiasts enjoy customizing and weathering their models to add even more realism.
Power Sources: These model locomotives can be powered by various methods, including electric, battery, and even live steam for larger scales. Electric models are the most common and can be controlled through a variety of systems, such as Digital Command Control (DCC).
Control Systems: Digital Command Control (DCC) is a popular control system for hobby trains, including diesel locomotives. DCC allows for individual control of multiple locomotives on the same track, with features like variable speed control, lighting effects, and sound.
Sound and Lighting: Many hobby train diesel locomotives come equipped with sound systems that mimic the actual sounds of diesel engines, including engine revving, horn blasts, and braking sounds. They also often have working headlights and other lighting features.
Collectibility: Collecting model diesel locomotives is a popular hobby in itself. Manufacturers produce limited-edition models, special runs, and rare prototypes that can become sought-after by collectors.
Layout Integration: Diesel locomotives are an integral part of model railroad layouts. Hobbyists design and build intricate layouts that can replicate real-life rail operations, complete with tracks, scenery, and various rolling stock.
Prototype Variety: Hobbyists have access to a wide range of diesel locomotive prototypes to choose from, including those from different eras and regions. This allows for diverse and historically accurate model railroads.
Customization: Enthusiasts often modify and customize their diesel locomotives to fit specific eras or railroads. This can include adding aftermarket parts, weathering, and other details to make the model unique.
Maintenance: Regular maintenance is essential to keep hobby train diesel locomotives running smoothly. Cleaning tracks, wheels, and ensuring proper electrical connections are crucial for reliable operation.
Hobby train diesel locomotives offer a captivating and engaging pastime for enthusiasts, allowing them to recreate the magic of railroading in miniature form while also exploring various aspects of model railroading, from layout design to electronics and mechanics.
Below you can find our editor's choice of the best hobby train diesel locomotives on the market
The Last Romantics: A Novel

The Romantics
Nemperor / Epic Associated

USB Star Night Light, 3 Colors -7 Lighting Effects, Aevdor Auto Roof Star Lights, Portable Adjustable Romantic Star Light Decoration for Bedroom, Car, Party, Ceiling and More- Plug and Play (Blue&Red)
- 【 3 Colors 】 The USB night light has 3 lighting modes-red, blue-purple,red and blue-purple combination. Compared to the USB star light with only one color, this light has multiple colors to choose.
- 【7 Lighting Effects】 Blue-violet, Red, Blue-violet and red combination, Blue-violet and red flashes simultaneously, Red flashing, Blue-violet flashing, Blue-violet and red Combination flash alternately. You can set up the light mode via pressing the button. Press 1 times to change the light effects, Press 7 times to switch it off, Press again once to switch on the USB night light.
- 【Interesting Romantic】Unique design is great for Car,bedroom,camping,parties.or adding a interesting and romantic atmosphere to your Leisure living area. And small size and light weight, takes small space.
- 【Easy to Use】The star night light can be powered instantly by powered bank, car interior USB port, computer etc, Just plug in a usb slot and done.
- 【Mode Adjustable】Has a turnable twist on the top so you can make different patterns ,lights Can make the whole room, car and more up with a great piercing Blue-violet and red galaxy worth.
User questions & answers
| Question: | Would this work with a panoramic sunroof |
| Answer: | It’s a metal ‘cord’ 13.5 cm (5.25in) from base to end of usb |
| Question: | Saludos! Necesito sabe si alguno de este producto prenden color rojo ariginalmente |
| Answer: | No it doesn’t change with the music. You have to manually adjust it to get the effect. |
| Question: | how long is the cord |
| Answer: | certainly |
| Question: | Does the light change with the music beat |
| Answer: | LotuLanternX |
Product features
7 Lighting Modes + Plug and Play
SEVEN MODES: Violet blue, Red, Violet blue and red combination, Violet blue and red flashes simultaneously, Red flashing, Violet blue flashing, Violet blue and red combination flash alternately. Press once to change the lighting effect. Press it seven times to turn it off, and press it again to turn it on.
THREE COLORS
The USB night light with 3 lighting modes-red, violet blue,red and violet blue combination. Compared to the USB star light with only one color, this light has multiple colors to choose.
360° Bending Freely
The gooseneck is very strong, no matter what angle you point to, it can keep bendingand produce a good romantic effect. It’s fun for DIY.
Upgrade functions
All function modes are completed by a one-button
in the car
This USB light is great for Home, Car,Travel, Bedroom or Party use.This you just plug into any usb and this thing shows beautiful red and blue stars on your wall or ceiling.
in the room
This USB light is great for Home, Car,Travel, Bedroom or Party use.This you just plug into any usb and this thing shows beautiful red and blue stars on your wall or ceiling.

Playlist: The Very Best Of The Romantics
Legacy
Product description
CD
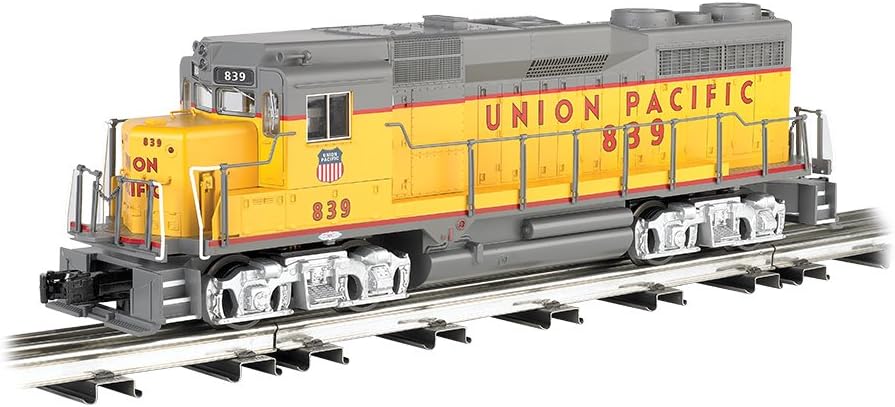
Bachmann Industries General Motors GP 30 Scale Diesel Locomotive Union Pacific 839 O Scale Train
Product description
General Motors GP 30 Scale Diesel Locomotive - UNION PACIFIC #839 - O Scale. Built between 1961 and 1963, the GP30 design reflected the latest engineering of the early 1960s. It owes its distinctive "hump," which spans the entire top of the locomotive, to General Motors' automotive stylists. Among its design innovations, the GP30 could be equipped with dynamic braking and an airtight hood to protect the air intake of its electrical cooling system. Features include: directional LED lighting, separately applied grabirons, drop-down steps and windshield wipers, wire-formed handrails, 6-amp reverse board with directional lock-out, prototypically correct details for dynamic and non-dynamic brake models, dual motors with flywheel coasting action, traction tires, durable ABS plastic shell, True Blast Plus 16-bit polyphonic sound including prime mover, horn and bell.
- True Blast Plus(TM) 16-bit polyphonic sound including prime mover, horn and bell
- Navigates O-27 curves
- 3 Rail O Scale Design
User questions & answers
| Question: | Does it use a transformer controller or Bluetooth |
| Answer: | side rails need to be assembled |
| Question: | If this train doesn’t come with a remote, what kind of remote do I get to run the train |
| Answer: | Yes |
| Question: | Any assembly required |
| Answer: | The dimensions of the box are 7.5x10.25x1.75 |
| Question: | Is ready right out of the box |
| Answer: | Ours launch no problem. You can contact lego.com customer service and they will send you replacement pieces at no cost:) |
Product features
Discover Everything Bachmann Trains Offers to Get Started in Model Railroading
Since 1833, Bachmann has been known for providing innovative design at a good value. We are now one of the world's largest distributor, by volume, of ready-to-run train sets, locomotives, track, and accessories. Bachmann is also the only train company to offer products in all five of the most popular scales: N, HO, On30, O, and Large Scale.
As a distributor of beloved Thomas & Friends products, Bachmann brings the adventures of Thomas the Tank Engine to life with a growing line of complete train sets, separate sale items, and accessories for children from 8 to 80-just add your imagination. Thomas & Friends is available in both HO and Large Scale.
Bachmann's exclusive snap-together E-Z Track System makes track setup quick, easy, and fun. Plasticville U.S.A. and SceneScapes buildings and accessories let you add the finishing touches for the perfect layout.
If You Are Purchasing a Train Set, It Will Include
- Locomotive
- Cars (Rolling Stock)
- E-Z Track – available in either black roadbed with steel alloy rail or gray roadbed with nickel silver rail
- Terminal/Rerailer
- Terminal Wire
- Speed Controller
- Power Supply
- List of Components
Track Assembly
- Decide where to set up your train – a dry, firm, flat surface works best!
- To make sure you have enough working room, make a test track layout by loosely placing track in desired configuration.
- The terminal/rerailer section will later be connected to a power pack and power supply, so place it near an outlet or power strip.
- Install under-track magnet, if your set comes with one. If your set does not come with one, magnets are available separately (HO Item No. 78999; N Scale Item No. 78998).
- Assemble the track by pushing together. Make sure the rail and joiners are seated properly. Be careful that the rail joiners do not slip under the rail without properly connecting. This can cause train derailments and electrical circuit interruptions.
- After track is assembled, double-check for joint connection and fit by lightly running your fingers over the top of the rails in both directions.
- If you detect bumps or distortion on the track surface, recheck the rail joiner fit.
Power Connections
- Power supply and speed control are plug and play; no tools are needed.
- Power is supplied to the track and the locomotive by the power supply, speed controller, terminal wire, and E-Z Track terminal/rerailer.
- First – turn knob on the speed controller counterclockwise until it stops (all the way to the left).
- Next – attach terminal wire to the speed controller by plugging it in where it says 'To Track.'
- Then – plug terminal wire into the E-Z Track terminal rerailer. Firmly push connector onto the track terminals.
- Finally – plug the connecting wire from the power supply into jack on the speed controller labeled 'IN'. Then plug power supply into a live wall outlet.
- Some sets may come with a speed controller with two push button connectors. These are used to supply AC power to accessories.
- To make positive and secure connections to these, push in buttons and insert each of the bare ends of the connection wire from your accessory.
- The speed controller is capable of powering one accessory at a time.
Putting the Train on the Track
- Put the locomotive on the track and run the wheels back and forth over the terminal rerailer track.
- When the wheels glide smoothly over the track, you know the wheels are all on the track. If your set comes with a tender, attach it to the locomotive.
- Add the rest of the cars that come with your set by placing them on the track and running them back and forth over the terminal rerailer until they glide smoothly. Then gently push the cars together – they will engage automatically.
- Do not try to connect cars when positioned over an under-track magnet.
How to Use E-Z Mate Couplers (HO and On30 Scale)
- Your set may be equipped with E-Z Mate magnetically operated knuckle couplers that let you perform real railroad switching and yard operations.
- Coupling two cars with E-Z Mate couplers is as easy as pushing them together when they are not over an under-track magnet.
- Uncoupling occurs only when over an under-track magnet and when there is no tension between the cars.
- To uncouple E-Z Mate couplers, stop two couplers directly over the under-track magnet. With no tension between the cars, the couplers will open automatically.
- If cars will not couple, check to be sure cars are not positioned over the uncoupling magnet or parked on a curve.
- If cars will not uncouple, check to be sure the couplers are positioned directly adjacent to the magnet position indicator and that the indicator is placed in line with the center line of the under-track magnet.
- Check that the magnet is secured to the underside of the track and fitted with the steel plate provided.
How to Run Your Train
- Turn the knob on the speed controller clockwise until it stops (all the way to the left).
- Plug in the power supply.
- Begin feeding power to the track by slowly turning the knob on the speed controller clockwise.
- Observe the direction of your train.
- If it moves backwards when the controls indicate forward, stop the train.
- Then simply disconnect, flip, and reconnect the terminal wire to the terminal rerailer track.
- Remember – never leave your train running unattended!
Action Checklist (Troubleshooting If Your Train Doesn’t Run or Stops Running)
- Is the power supply plugged in to a live receptacle?
- Are the wheels on the track?
- Is the wiring secure?
- Is the track properly assembled?
- Is the track properly seated in the rail joiner?
- If your train stops or fails to start, a short circuit may be indicated. If this is the case, Unplug the power supply immediately.
- Common reasons for a short circuit: derailed wheels may cause a short. Check to make sure all wheels are on the track. Also check all connections and make sure there is no metal of any sort across the rails.
- After checking everything carefully, resume operation.
- Please note, your power supply is protected by a circuit breaker that automatically resets after a short circuit is corrected.
- Allow up to 5 minutes for the circuit breaker to reset before resuming operation.
Keep Your Train in Top Operating Condition
- Works better after couple hours of break-in time.
- Train performs best under clean operating conditions.
- Clean wheels and a clean track ensure good electrical contact.
- After about every 8 hours of operation, wipe the track rails and exposed wheels with a soft, lint-free cloth.
- Removal of black residue is normal.
- Do not use steel wool to clean your track.
- Do not use common solvents, they may damage plastics - use track cleaner.
- After 24 hours of use, light lubrication is required to keep train in top operating condition. Bachmann E-Z Lube or other hobby-grade lubricants are recommended.
Bachmann hopes you enjoy your train for many years to come!

GP-30 DCC Sound Value Equipped Locomotive - Santa FE #1218 (Blue & Yellow)
Bachmann Trains
Product description
GP-30 DCC Sound Value Equipped Locomotive - SANTA FE #1218 (blue & yellow) - HO Scale. There’s no missing a GP30’s characteristic “hump, ” which was developed at the GM Automotive Styling Center. As well as creating a more modern appearance, the design was a practical way to house air intakes for the central air system and dynamic brakes. Bachmann carries on the prototype’s innovative history by offering a new DCC sound-equipped model. Our exclusive Sound Value SoundTraxx diesel sound package includes prototypical prime mover, 3 air horns, and bell—all in polyphonic 16-bit sound. This model also features all-wheel drive, operating headlight, and E-Z Mate Mark II couplers.
- DCC Sound package includes prototypical prime mover, 3 air horns, and bell—all in polyphonic 16-bit sound.
- Operating Headlight
- All-wheel Drive, and E-Z MateMark II Couplers
- Preforms Best on 18" Radius Curves or Greater
- HO Scale: 1: 87
Product features
Discover Everything Bachmann Trains Offers to Get Started in Model Railroading
Since 1833, Bachmann has been known for providing innovative design at a good value. We are now one of the world's largest distributor, by volume, of ready-to-run train sets, locomotives, track, and accessories. Bachmann is also the only train company to offer products in all five of the most popular scales: N, HO, On30, O, and Large Scale.
As a distributor of beloved Thomas & Friends products, Bachmann brings the adventures of Thomas the Tank Engine to life with a growing line of complete train sets, separate sale items, and accessories for children from 8 to 80-just add your imagination. Thomas & Friends is available in both HO and Large Scale.
Bachmann's exclusive snap-together E-Z Track System makes track setup quick, easy, and fun. Plasticville U.S.A. and SceneScapes buildings and accessories let you add the finishing touches for the perfect layout.
If You Are Purchasing a Train Set, It Will Include
- Locomotive
- Cars (Rolling Stock)
- E-Z Track – available in either black roadbed with steel alloy rail or gray roadbed with nickel silver rail
- Terminal/Rerailer
- Terminal Wire
- Speed Controller
- Power Supply
- List of Components
Track Assembly
- Decide where to set up your train – a dry, firm, flat surface works best!
- To make sure you have enough working room, make a test track layout by loosely placing track in desired configuration.
- The terminal/rerailer section will later be connected to a power pack and power supply, so place it near an outlet or power strip.
- Install under-track magnet, if your set comes with one. If your set does not come with one, magnets are available separately (HO Item No. 78999; N Scale Item No. 78998).
- Assemble the track by pushing together. Make sure the rail and joiners are seated properly. Be careful that the rail joiners do not slip under the rail without properly connecting. This can cause train derailments and electrical circuit interruptions.
- After track is assembled, double-check for joint connection and fit by lightly running your fingers over the top of the rails in both directions.
- If you detect bumps or distortion on the track surface, recheck the rail joiner fit.
Power Connections
- Power supply and speed control are plug and play; no tools are needed.
- Power is supplied to the track and the locomotive by the power supply, speed controller, terminal wire, and E-Z Track terminal/rerailer.
- First – turn knob on the speed controller counterclockwise until it stops (all the way to the left).
- Next – attach terminal wire to the speed controller by plugging it in where it says 'To Track.'
- Then – plug terminal wire into the E-Z Track terminal rerailer. Firmly push connector onto the track terminals.
- Finally – plug the connecting wire from the power supply into jack on the speed controller labeled 'IN'. Then plug power supply into a live wall outlet.
- Some sets may come with a speed controller with two push button connectors. These are used to supply AC power to accessories.
- To make positive and secure connections to these, push in buttons and insert each of the bare ends of the connection wire from your accessory.
- The speed controller is capable of powering one accessory at a time.
Putting the Train on the Track
- Put the locomotive on the track and run the wheels back and forth over the terminal rerailer track.
- When the wheels glide smoothly over the track, you know the wheels are all on the track. If your set comes with a tender, attach it to the locomotive.
- Add the rest of the cars that come with your set by placing them on the track and running them back and forth over the terminal rerailer until they glide smoothly. Then gently push the cars together – they will engage automatically.
- Do not try to connect cars when positioned over an under-track magnet.
How to Use E-Z Mate Couplers (HO and On30 Scale)
- Your set may be equipped with E-Z Mate magnetically operated knuckle couplers that let you perform real railroad switching and yard operations.
- Coupling two cars with E-Z Mate couplers is as easy as pushing them together when they are not over an under-track magnet.
- Uncoupling occurs only when over an under-track magnet and when there is no tension between the cars.
- To uncouple E-Z Mate couplers, stop two couplers directly over the under-track magnet. With no tension between the cars, the couplers will open automatically.
- If cars will not couple, check to be sure cars are not positioned over the uncoupling magnet or parked on a curve.
- If cars will not uncouple, check to be sure the couplers are positioned directly adjacent to the magnet position indicator and that the indicator is placed in line with the center line of the under-track magnet.
- Check that the magnet is secured to the underside of the track and fitted with the steel plate provided.
How to Run Your Train
- Turn the knob on the speed controller clockwise until it stops (all the way to the left).
- Plug in the power supply.
- Begin feeding power to the track by slowly turning the knob on the speed controller clockwise.
- Observe the direction of your train.
- If it moves backwards when the controls indicate forward, stop the train.
- Then simply disconnect, flip, and reconnect the terminal wire to the terminal rerailer track.
- Remember – never leave your train running unattended!
Action Checklist (Troubleshooting If Your Train Doesn’t Run or Stops Running)
- Is the power supply plugged in to a live receptacle?
- Are the wheels on the track?
- Is the wiring secure?
- Is the track properly assembled?
- Is the track properly seated in the rail joiner?
- If your train stops or fails to start, a short circuit may be indicated. If this is the case, Unplug the power supply immediately.
- Common reasons for a short circuit: derailed wheels may cause a short. Check to make sure all wheels are on the track. Also check all connections and make sure there is no metal of any sort across the rails.
- After checking everything carefully, resume operation.
- Please note, your power supply is protected by a circuit breaker that automatically resets after a short circuit is corrected.
- Allow up to 5 minutes for the circuit breaker to reset before resuming operation.
Keep Your Train in Top Operating Condition
- Works better after couple hours of break-in time.
- Train performs best under clean operating conditions.
- Clean wheels and a clean track ensure good electrical contact.
- After about every 8 hours of operation, wipe the track rails and exposed wheels with a soft, lint-free cloth.
- Removal of black residue is normal.
- Do not use steel wool to clean your track.
- Do not use common solvents, they may damage plastics - use track cleaner.
- After 24 hours of use, light lubrication is required to keep train in top operating condition. Bachmann E-Z Lube or other hobby-grade lubricants are recommended.
Bachmann hopes you enjoy your train for many years to come!

Bachmann Industries Southern #2910 Diesel Locomotive Train
Bachmann Trains
Product description
EMD e7-a DCC sound value equipped diesel locomotive - Southern #2910 - HO scale. Designed for high-speed passenger service, the first "e" series diesel was introduced by GM in 1937 and became one of the most popular passenger engines ever made. Bachmann is introducing a DCC sound-equipped EMD e7-a diesel that includes our sound value SoundTraxx diesel sound package with prototypical Prime mover, 3 air horns, and bell—all in polyphonic 16-bit sound. Features include precision motor with dual flywheels, die-cast frame, all-wheel drive, illuminated number boards, operating LED double headlight per prototype, RP25 wheel contours, and E-Z Mate mark II couplers.
- DCC sound-equipped 66602 includes our sound value sound package with prototypical prime mover, 3 air horns, and bell—all in polyphonic 16-bit sound
- For use with all NMRA/ NEM Compliant DCC systems, Compatible with conventional dc-powered Layouts, programing on the main, 128 speed step control
- Precision motor with dual Flywheels, die-cast frame, all-wheel drive, illuminated number boards, operating LED double headlight per prototype, RP25 wheel Contours, and E-Z Mate Mark II couplers.
- Performs best on 22" radius curves or greater
- HO scale 1: 87
Product features
Discover Everything Bachmann Trains Offers to Get Started in Model Railroading
Since 1833, Bachmann has been known for providing innovative design at a good value. We are now one of the world's largest distributor, by volume, of ready-to-run train sets, locomotives, track, and accessories. Bachmann is also the only train company to offer products in all five of the most popular scales: N, HO, On30, O, and Large Scale.
As a distributor of beloved Thomas & Friends products, Bachmann brings the adventures of Thomas the Tank Engine to life with a growing line of complete train sets, separate sale items, and accessories for children from 8 to 80-just add your imagination. Thomas & Friends is available in both HO and Large Scale.
Bachmann's exclusive snap-together E-Z Track System makes track setup quick, easy, and fun. Plasticville U.S.A. and SceneScapes buildings and accessories let you add the finishing touches for the perfect layout.
If You Are Purchasing a Train Set, It Will Include
- Locomotive
- Cars (Rolling Stock)
- E-Z Track – available in either black roadbed with steel alloy rail or gray roadbed with nickel silver rail
- Terminal/Rerailer
- Terminal Wire
- Speed Controller
- Power Supply
- List of Components
Track Assembly
- Decide where to set up your train – a dry, firm, flat surface works best!
- To make sure you have enough working room, make a test track layout by loosely placing track in desired configuration.
- The terminal/rerailer section will later be connected to a power pack and power supply, so place it near an outlet or power strip.
- Install under-track magnet, if your set comes with one. If your set does not come with one, magnets are available separately (HO Item No. 78999; N Scale Item No. 78998).
- Assemble the track by pushing together. Make sure the rail and joiners are seated properly. Be careful that the rail joiners do not slip under the rail without properly connecting. This can cause train derailments and electrical circuit interruptions.
- After track is assembled, double-check for joint connection and fit by lightly running your fingers over the top of the rails in both directions.
- If you detect bumps or distortion on the track surface, recheck the rail joiner fit.
Power Connections
- Power supply and speed control are plug and play; no tools are needed.
- Power is supplied to the track and the locomotive by the power supply, speed controller, terminal wire, and E-Z Track terminal/rerailer.
- First – turn knob on the speed controller counterclockwise until it stops (all the way to the left).
- Next – attach terminal wire to the speed controller by plugging it in where it says 'To Track.'
- Then – plug terminal wire into the E-Z Track terminal rerailer. Firmly push connector onto the track terminals.
- Finally – plug the connecting wire from the power supply into jack on the speed controller labeled 'IN'. Then plug power supply into a live wall outlet.
- Some sets may come with a speed controller with two push button connectors. These are used to supply AC power to accessories.
- To make positive and secure connections to these, push in buttons and insert each of the bare ends of the connection wire from your accessory.
- The speed controller is capable of powering one accessory at a time.
Putting the Train on the Track
- Put the locomotive on the track and run the wheels back and forth over the terminal rerailer track.
- When the wheels glide smoothly over the track, you know the wheels are all on the track. If your set comes with a tender, attach it to the locomotive.
- Add the rest of the cars that come with your set by placing them on the track and running them back and forth over the terminal rerailer until they glide smoothly. Then gently push the cars together – they will engage automatically.
- Do not try to connect cars when positioned over an under-track magnet.
How to Use E-Z Mate Couplers (HO and On30 Scale)
- Your set may be equipped with E-Z Mate magnetically operated knuckle couplers that let you perform real railroad switching and yard operations.
- Coupling two cars with E-Z Mate couplers is as easy as pushing them together when they are not over an under-track magnet.
- Uncoupling occurs only when over an under-track magnet and when there is no tension between the cars.
- To uncouple E-Z Mate couplers, stop two couplers directly over the under-track magnet. With no tension between the cars, the couplers will open automatically.
- If cars will not couple, check to be sure cars are not positioned over the uncoupling magnet or parked on a curve.
- If cars will not uncouple, check to be sure the couplers are positioned directly adjacent to the magnet position indicator and that the indicator is placed in line with the center line of the under-track magnet.
- Check that the magnet is secured to the underside of the track and fitted with the steel plate provided.
How to Run Your Train
- Turn the knob on the speed controller clockwise until it stops (all the way to the left).
- Plug in the power supply.
- Begin feeding power to the track by slowly turning the knob on the speed controller clockwise.
- Observe the direction of your train.
- If it moves backwards when the controls indicate forward, stop the train.
- Then simply disconnect, flip, and reconnect the terminal wire to the terminal rerailer track.
- Remember – never leave your train running unattended!
Action Checklist (Troubleshooting If Your Train Doesn’t Run or Stops Running)
- Is the power supply plugged in to a live receptacle?
- Are the wheels on the track?
- Is the wiring secure?
- Is the track properly assembled?
- Is the track properly seated in the rail joiner?
- If your train stops or fails to start, a short circuit may be indicated. If this is the case, Unplug the power supply immediately.
- Common reasons for a short circuit: derailed wheels may cause a short. Check to make sure all wheels are on the track. Also check all connections and make sure there is no metal of any sort across the rails.
- After checking everything carefully, resume operation.
- Please note, your power supply is protected by a circuit breaker that automatically resets after a short circuit is corrected.
- Allow up to 5 minutes for the circuit breaker to reset before resuming operation.
Keep Your Train in Top Operating Condition
- Works better after couple hours of break-in time.
- Train performs best under clean operating conditions.
- Clean wheels and a clean track ensure good electrical contact.
- After about every 8 hours of operation, wipe the track rails and exposed wheels with a soft, lint-free cloth.
- Removal of black residue is normal.
- Do not use steel wool to clean your track.
- Do not use common solvents, they may damage plastics - use track cleaner.
- After 24 hours of use, light lubrication is required to keep train in top operating condition. Bachmann E-Z Lube or other hobby-grade lubricants are recommended.
Bachmann hopes you enjoy your train for many years to come!

Kato USA Model Train Products N EMD SD70ACe Cab Headlight Version - Norfolk Southern #1001
Kato USA Model Train Products
Product description
The SD70ACe is the latest in the line of EMD's "70" locomotives that is intended to cut railroad costs for maintenance by providing a locomotive that is more efficient and more powerful, lessening fuel costs and the total numbers of running units. The Norfolk Southern’s fleet of SD70ACe’s have a number of redesigns from the “as delivered” Union Pacific units, including isolated cabs (identifiable by the visible angled seam running 45 degrees up and along the side of the cab) and specialized antenna arrangements on the cab roof.
- Prototype-accurate bolsterless non-radial HTSC truck and five chime airhorn
- Exceptional and crisp molding to accentuate the distinct angular lines of the nose and high dynamic brake
- Powerful five-pole KATO motor with dual brass flywheels
- Directional Headlight and illuminated, preprinted numberboards
- Illuminated ditch lights
User questions & answers
| Question: | Is there a digitrax decorder for this |
| Answer: | Yes, Kato N scale products will operate on Bachmann N scale track. |
| Question: | Does the locomotive come with platform rails |
| Answer: | This specific model is a DC analog locomotive. Kato does offer the same locomotive with DCC installed |
| Question: | Will it work on bachman tracks |
| Answer: | No it does not use Bluetooth technology to control the Locomotive. Be aware that I return the locomotive because it really is meant to run on O-31 radius curves and not O-27. :( |
| Question: | Is this a dc or dcc locomotive |
| Answer: | It needs a O Gauge transformer or power pack. |

Bachmann Industries B&O #74 Diesel Locomotive Train
Bachmann Trains
Product description
EMD e7-a DCC sound value equipped diesel locomotive - B&O #74 - HO scale. Designed for high-speed passenger service, the first "e" series diesel was introduced by GM in 1937 and became one of the most popular passenger engines ever made. Bachmann is introducing a DCC sound-equipped EMD e7-a diesel that includes our sound value SoundTraxx diesel sound package with prototypical Prime mover, 3 air horns, and bell—all in polyphonic 16-bit sound. Features include precision motor with dual flywheels, die-cast frame, all-wheel drive, illuminated number boards, operating LED double headlight per prototype, RP25 wheel contours, and E-Z Mate mark II couplers.
- DCC sound-equipped 66605 includes our sound value sound package with prototypical prime mover, 3 air horns, and bell—all in polyphonic 16-bit sound
- For use with all NMRA/ NEM Compliant DCC systems, Compatible with conventional dc-powered Layouts, programing on the main, 128 speed step control
- Precision motor with dual Flywheels, die-cast frame, all-wheel drive, illuminated number boards, operating LED double headlight per prototype, RP25 wheel Contours, and E-Z Mate Mark II couplers.
- Performs best on 22" radius curves or greater
- HO scale 1: 87
Product features
Discover Everything Bachmann Trains Offers to Get Started in Model Railroading
Since 1833, Bachmann has been known for providing innovative design at a good value. We are now one of the world's largest distributor, by volume, of ready-to-run train sets, locomotives, track, and accessories. Bachmann is also the only train company to offer products in all five of the most popular scales: N, HO, On30, O, and Large Scale.
As a distributor of beloved Thomas & Friends products, Bachmann brings the adventures of Thomas the Tank Engine to life with a growing line of complete train sets, separate sale items, and accessories for children from 8 to 80-just add your imagination. Thomas & Friends is available in both HO and Large Scale.
Bachmann's exclusive snap-together E-Z Track System makes track setup quick, easy, and fun. Plasticville U.S.A. and SceneScapes buildings and accessories let you add the finishing touches for the perfect layout.
If You Are Purchasing a Train Set, It Will Include
- Locomotive
- Cars (Rolling Stock)E-
- Z Track – available in either black roadbed with steel alloy rail or gray roadbed with nickel silver rail
- Terminal/Rerailer
- Terminal Wire
- Speed Controller
- Power Supply
- List of Components
Track Assembly
- Decide where to set up your train – a dry, firm, flat surface works best!
- To make sure you have enough working room, make a test track layout by loosely placing track in desired configuration.
- The terminal/rerailer section will later be connected to a power pack and power supply, so place it near an outlet or power strip.
- Install under-track magnet, if your set comes with one. If your set does not come with one, magnets are available separately (HO Item No. 78999; N Scale Item No. 78998).
- Assemble the track by pushing together. Make sure the rail and joiners are seated properly. Be careful that the rail joiners do not slip under the rail without properly connecting. This can cause train derailments and electrical circuit interruptions.
- After track is assembled, double-check for joint connection and fit by lightly running your fingers over the top of the rails in both directions.
- If you detect bumps or distortion on the track surface, recheck the rail joiner fit.
Power Connections
- Power supply and speed control are plug and play; no tools are needed.
- Power is supplied to the track and the locomotive by the power supply, speed controller, terminal wire, and E-Z Track terminal/rerailer.
- First – turn knob on the speed controller counterclockwise until it stops (all the way to the left).
- Next – attach terminal wire to the speed controller by plugging it in where it says 'To Track.'
- Then – plug terminal wire into the E-Z Track terminal rerailer. Firmly push connector onto the track terminals.
- Finally – plug the connecting wire from the power supply into jack on the speed controller labeled 'IN'. Then plug power supply into a live wall outlet.
- Some sets may come with a speed controller with two push button connectors. These are used to supply AC power to accessories.
- To make positive and secure connections to these, push in buttons and insert each of the bare ends of the connection wire from your accessory.
- The speed controller is capable of powering one accessory at a time.
Putting the Train on the Track
- Put the locomotive on the track and run the wheels back and forth over the terminal rerailer track.
- When the wheels glide smoothly over the track, you know the wheels are all on the track. If your set comes with a tender, attach it to the locomotive.
- Add the rest of the cars that come with your set by placing them on the track and running them back and forth over the terminal rerailer until they glide smoothly. Then gently push the cars together – they will engage automatically.
- Do not try to connect cars when positioned over an under-track magnet.
How to Use E-Z Mate Couplers (HO and On30 Scale)
- Your set may be equipped with E-Z Mate magnetically operated knuckle couplers that let you perform real railroad switching and yard operations.
- Coupling two cars with E-Z Mate couplers is as easy as pushing them together when they are not over an under-track magnet.
- Uncoupling occurs only when over an under-track magnet and when there is no tension between the cars.
- To uncouple E-Z Mate couplers, stop two couplers directly over the under-track magnet. With no tension between the cars, the couplers will open automatically.
- If cars will not couple, check to be sure cars are not positioned over the uncoupling magnet or parked on a curve.
- If cars will not uncouple, check to be sure the couplers are positioned directly adjacent to the magnet position indicator and that the indicator is placed in line with the center line of the under-track magnet.
- Check that the magnet is secured to the underside of the track and fitted with the steel plate provided.
How to Run Your Train
- Turn the knob on the speed controller clockwise until it stops (all the way to the left).
- Plug in the power supply.
- Begin feeding power to the track by slowly turning the knob on the speed controller clockwise.
- Observe the direction of your train.
- If it moves backwards when the controls indicate forward, stop the train.
- Then simply disconnect, flip, and reconnect the terminal wire to the terminal rerailer track.
- Remember – never leave your train running unattended!
Action Checklist (Troubleshooting If Your Train Doesn’t Run or Stops Running)
- Is the power supply plugged in to a live receptacle?
- Are the wheels on the track?
- Is the wiring secure?
- Is the track properly assembled?
- Is the track properly seated in the rail joiner?
- If your train stops or fails to start, a short circuit may be indicated. If this is the case, Unplug the power supply immediately.
- Common reasons for a short circuit: derailed wheels may cause a short. Check to make sure all wheels are on the track. Also check all connections and make sure there is no metal of any sort across the rails.
- After checking everything carefully, resume operation.
- Please note, your power supply is protected by a circuit breaker that automatically resets after a short circuit is corrected.
- Allow up to 5 minutes for the circuit breaker to reset before resuming operation.
Keep Your Train in Top Operating Condition
- Works better after couple hours of break-in time.
- Train performs best under clean operating conditions.
- Clean wheels and a clean track ensure good electrical contact.
- After about every 8 hours of operation, wipe the track rails and exposed wheels with a soft, lint-free cloth.
- Removal of black residue is normal.
- Do not use steel wool to clean your track.
- Do not use common solvents, they may damage plastics - use track cleaner.
- After 24 hours of use, light lubrication is required to keep train in top operating condition. Bachmann E-Z Lube or other hobby-grade lubricants are recommended.
Bachmann hopes you enjoy your train for many years to come!

Bachmann Industries AMTRAK #926 Diesel Locomotive Train
Bachmann Trains
Product description
Gg-1 DCC ready electric locomotive - Amtrak #926 - HO scale. The electric gg-1 was introduced in the 1930S by the Pennsylvania railroad, which needed a locomotive that could carry more rolling stock at greater speeds. Its dynamic streamlined design captured the public's imagination and made it the Star of countless movies and advertisements. This DCC-ready 65207 features include: all new tooling, die-cast frame, 12-wheel drive, twin operating metal pantographs that can be powered by overhead wire if desired, soft white LED directional headlights with dimming function, factory-installed 8-pin socket ready for DCC decoder installation of your choice, E-Z Mate mark II couplers.
- Pre-wired factory-installed 8-pin socket for the DCC decoder installation of your choice. Decoders sold separately
- Compatible with conventional dc-powered Layouts
- Die-cast frame, 12-wheel drive, twin operating metal pantographs that can be powered by overhead wire if desired
- Soft white LED directional headlights with dimming function, E-Z Mate Mark II couplers.
- Preforms best on 22" radius curves or greater, HO scale 1: 87
Product features
Discover Everything Bachmann Trains Offers to Get Started in Model Railroading
Since 1833, Bachmann has been known for providing innovative design at a good value. We are now one of the world's largest distributor, by volume, of ready-to-run train sets, locomotives, track, and accessories. Bachmann is also the only train company to offer products in all five of the most popular scales: N, HO, On30, O, and Large Scale.
As a distributor of beloved Thomas & Friends products, Bachmann brings the adventures of Thomas the Tank Engine to life with a growing line of complete train sets, separate sale items, and accessories for children from 8 to 80-just add your imagination. Thomas & Friends is available in both HO and Large Scale.
Bachmann's exclusive snap-together E-Z Track System makes track setup quick, easy, and fun. Plasticville U.S.A. and SceneScapes buildings and accessories let you add the finishing touches for the perfect layout.
If You Are Purchasing a Train Set, It Will Include
- Locomotive
- Cars (Rolling Stock)
- E-Z Track – available in either black roadbed with steel alloy rail or gray roadbed with nickel silver rail
- Terminal/Rerailer
- Terminal Wire
- Speed Controller
- Power Supply
- List of Components
Track Assembly
- Decide where to set up your train – a dry, firm, flat surface works best!
- To make sure you have enough working room, make a test track layout by loosely placing track in desired configuration.
- The terminal/rerailer section will later be connected to a power pack and power supply, so place it near an outlet or power strip.
- Install under-track magnet, if your set comes with one. If your set does not come with one, magnets are available separately (HO Item No. 78999; N Scale Item No. 78998).
- Assemble the track by pushing together. Make sure the rail and joiners are seated properly. Be careful that the rail joiners do not slip under the rail without properly connecting. This can cause train derailments and electrical circuit interruptions.
- After track is assembled, double-check for joint connection and fit by lightly running your fingers over the top of the rails in both directions.
- If you detect bumps or distortion on the track surface, recheck the rail joiner fit.
Power Connections
- Power supply and speed control are plug and play; no tools are needed.
- Power is supplied to the track and the locomotive by the power supply, speed controller, terminal wire, and E-Z Track terminal/rerailer.
- First – turn knob on the speed controller counterclockwise until it stops (all the way to the left).
- Next – attach terminal wire to the speed controller by plugging it in where it says 'To Track.'
- Then – plug terminal wire into the E-Z Track terminal rerailer. Firmly push connector onto the track terminals.
- Finally – plug the connecting wire from the power supply into jack on the speed controller labeled 'IN'. Then plug power supply into a live wall outlet.
- Some sets may come with a speed controller with two push button connectors. These are used to supply AC power to accessories.
- To make positive and secure connections to these, push in buttons and insert each of the bare ends of the connection wire from your accessory.
- The speed controller is capable of powering one accessory at a time.
Putting the Train on the Track
- Put the locomotive on the track and run the wheels back and forth over the terminal rerailer track.
- When the wheels glide smoothly over the track, you know the wheels are all on the track. If your set comes with a tender, attach it to the locomotive.
- Add the rest of the cars that come with your set by placing them on the track and running them back and forth over the terminal rerailer until they glide smoothly. Then gently push the cars together – they will engage automatically.
- Do not try to connect cars when positioned over an under-track magnet.
How to Use E-Z Mate Couplers (HO and On30 Scale)
- Your set may be equipped with E-Z Mate magnetically operated knuckle couplers that let you perform real railroad switching and yard operations.
- Coupling two cars with E-Z Mate couplers is as easy as pushing them together when they are not over an under-track magnet.
- Uncoupling occurs only when over an under-track magnet and when there is no tension between the cars.
- To uncouple E-Z Mate couplers, stop two couplers directly over the under-track magnet. With no tension between the cars, the couplers will open automatically.
- If cars will not couple, check to be sure cars are not positioned over the uncoupling magnet or parked on a curve.
- If cars will not uncouple, check to be sure the couplers are positioned directly adjacent to the magnet position indicator and that the indicator is placed in line with the center line of the under-track magnet.
- Check that the magnet is secured to the underside of the track and fitted with the steel plate provided.
How to Run Your Train
- Turn the knob on the speed controller clockwise until it stops (all the way to the left).
- Plug in the power supply.
- Begin feeding power to the track by slowly turning the knob on the speed controller clockwise.
- Observe the direction of your train.
- If it moves backwards when the controls indicate forward, stop the train.
- Then simply disconnect, flip, and reconnect the terminal wire to the terminal rerailer track.
- Remember – never leave your train running unattended!
Action Checklist (Troubleshooting If Your Train Doesn’t Run or Stops Running)
- Is the power supply plugged in to a live receptacle?
- Are the wheels on the track?
- Is the wiring secure?
- Is the track properly assembled?
- Is the track properly seated in the rail joiner?
- If your train stops or fails to start, a short circuit may be indicated. If this is the case, Unplug the power supply immediately.
- Common reasons for a short circuit: derailed wheels may cause a short. Check to make sure all wheels are on the track. Also check all connections and make sure there is no metal of any sort across the rails.
- After checking everything carefully, resume operation.
- Please note, your power supply is protected by a circuit breaker that automatically resets after a short circuit is corrected.
- Allow up to 5 minutes for the circuit breaker to reset before resuming operation.
Keep Your Train in Top Operating Condition
- Works better after couple hours of break-in time.
- Train performs best under clean operating conditions.
- Clean wheels and a clean track ensure good electrical contact.
- After about every 8 hours of operation, wipe the track rails and exposed wheels with a soft, lint-free cloth.
- Removal of black residue is normal.
- Do not use steel wool to clean your track.
- Do not use common solvents, they may damage plastics - use track cleaner.
- After 24 hours of use, light lubrication is required to keep train in top operating condition. Bachmann E-Z Lube or other hobby-grade lubricants are recommended.
Bachmann hopes you enjoy your train for many years to come!

Bachmann Industries CB&Q #99168 Diesel Locomotive Train
Bachmann Trains
Product description
EMD e7-a DCC sound value equipped diesel locomotive - cb & q #99168 (with Mars light) - HO scale. Designed for high-speed passenger service, the first "e" series diesel was introduced by GM in 1937 and became one of the most popular passenger engines ever made. Bachmann is introducing a DCC sound-equipped EMD e7-a diesel that includes our sound value SoundTraxx diesel sound package with prototypical Prime mover, 3 air horns, and bell—all in polyphonic 16-bit sound. Features include precision motor with dual flywheels, die-cast frame, all-wheel drive, illuminated number boards, operating LED double headlight per prototype, RP25 wheel contours, and E-Z Mate mark II couplers.
- DCC sound-equipped 66603 includes our sound value sound package with prototypical prime mover, 3 air horns, and bell—all in polyphonic 16-bit sound
- For use with all NMRA/ NEM Compliant DCC systems, Compatible with conventional dc-powered Layouts, programing on the main, 128 speed step control
- Precision motor with dual Flywheels, die-cast frame, all-wheel drive, illuminated number boards, operating LED double headlight per prototype, RP25 wheel Contours, and E-Z Mate Mark II couplers.
- Performs best on 22" radius curves or greater
- HO scale 1: 87
Product features
Discover Everything Bachmann Trains Offers to Get Started in Model Railroading
Since 1833, Bachmann has been known for providing innovative design at a good value. We are now one of the world's largest distributor, by volume, of ready-to-run train sets, locomotives, track, and accessories. Bachmann is also the only train company to offer products in all five of the most popular scales: N, HO, On30, O, and Large Scale.
As a distributor of beloved Thomas & Friends products, Bachmann brings the adventures of Thomas the Tank Engine to life with a growing line of complete train sets, separate sale items, and accessories for children from 8 to 80-just add your imagination. Thomas & Friends is available in both HO and Large Scale.
Bachmann's exclusive snap-together E-Z Track System makes track setup quick, easy, and fun. Plasticville U.S.A. and SceneScapes buildings and accessories let you add the finishing touches for the perfect layout.
If You Are Purchasing a Train Set, It Will Include
- Locomotive
- Cars (Rolling Stock)
- E-Z Track – available in either black roadbed with steel alloy rail or gray roadbed with nickel silver rail
- Terminal/Rerailer
- Terminal Wire
- Speed Controller
- Power Supply
- List of Components
Track Assembly
- Decide where to set up your train – a dry, firm, flat surface works best!
- To make sure you have enough working room, make a test track layout by loosely placing track in desired configuration.
- The terminal/rerailer section will later be connected to a power pack and power supply, so place it near an outlet or power strip.
- Install under-track magnet, if your set comes with one. If your set does not come with one, magnets are available separately (HO Item No. 78999; N Scale Item No. 78998).
- Assemble the track by pushing together. Make sure the rail and joiners are seated properly. Be careful that the rail joiners do not slip under the rail without properly connecting. This can cause train derailments and electrical circuit interruptions.
- After track is assembled, double-check for joint connection and fit by lightly running your fingers over the top of the rails in both directions.
- If you detect bumps or distortion on the track surface, recheck the rail joiner fit.
Power Connections
- Power supply and speed control are plug and play; no tools are needed.
- Power is supplied to the track and the locomotive by the power supply, speed controller, terminal wire, and E-Z Track terminal/rerailer.
- First – turn knob on the speed controller counterclockwise until it stops (all the way to the left).
- Next – attach terminal wire to the speed controller by plugging it in where it says 'To Track.'
- Then – plug terminal wire into the E-Z Track terminal rerailer. Firmly push connector onto the track terminals.
- Finally – plug the connecting wire from the power supply into jack on the speed controller labeled 'IN'. Then plug power supply into a live wall outlet.
- Some sets may come with a speed controller with two push button connectors. These are used to supply AC power to accessories.
- To make positive and secure connections to these, push in buttons and insert each of the bare ends of the connection wire from your accessory.
- The speed controller is capable of powering one accessory at a time.
Putting the Train on the Track
- Put the locomotive on the track and run the wheels back and forth over the terminal rerailer track.
- When the wheels glide smoothly over the track, you know the wheels are all on the track. If your set comes with a tender, attach it to the locomotive.
- Add the rest of the cars that come with your set by placing them on the track and running them back and forth over the terminal rerailer until they glide smoothly. Then gently push the cars together – they will engage automatically.
- Do not try to connect cars when positioned over an under-track magnet.
How to Use E-Z Mate Couplers (HO and On30 Scale)
- Your set may be equipped with E-Z Mate magnetically operated knuckle couplers that let you perform real railroad switching and yard operations.
- Coupling two cars with E-Z Mate couplers is as easy as pushing them together when they are not over an under-track magnet.
- Uncoupling occurs only when over an under-track magnet and when there is no tension between the cars.
- To uncouple E-Z Mate couplers, stop two couplers directly over the under-track magnet. With no tension between the cars, the couplers will open automatically.
- If cars will not couple, check to be sure cars are not positioned over the uncoupling magnet or parked on a curve.
- If cars will not uncouple, check to be sure the couplers are positioned directly adjacent to the magnet position indicator and that the indicator is placed in line with the center line of the under-track magnet.
- Check that the magnet is secured to the underside of the track and fitted with the steel plate provided.
How to Run Your Train
- Turn the knob on the speed controller clockwise until it stops (all the way to the left).
- Plug in the power supply.
- Begin feeding power to the track by slowly turning the knob on the speed controller clockwise.
- Observe the direction of your train.
- If it moves backwards when the controls indicate forward, stop the train.
- Then simply disconnect, flip, and reconnect the terminal wire to the terminal rerailer track.
- Remember – never leave your train running unattended!
Action Checklist (Troubleshooting If Your Train Doesn’t Run or Stops Running)
- Is the power supply plugged in to a live receptacle?
- Are the wheels on the track?
- Is the wiring secure?
- Is the track properly assembled?
- Is the track properly seated in the rail joiner?
- If your train stops or fails to start, a short circuit may be indicated. If this is the case, Unplug the power supply immediately.
- Common reasons for a short circuit: derailed wheels may cause a short. Check to make sure all wheels are on the track. Also check all connections and make sure there is no metal of any sort across the rails.
- After checking everything carefully, resume operation.
- Please note, your power supply is protected by a circuit breaker that automatically resets after a short circuit is corrected.
- Allow up to 5 minutes for the circuit breaker to reset before resuming operation.
Keep Your Train in Top Operating Condition
- Works better after couple hours of break-in time.
- Train performs best under clean operating conditions.
- Clean wheels and a clean track ensure good electrical contact.
- After about every 8 hours of operation, wipe the track rails and exposed wheels with a soft, lint-free cloth.
- Removal of black residue is normal.
- Do not use steel wool to clean your track.
- Do not use common solvents, they may damage plastics - use track cleaner.
- After 24 hours of use, light lubrication is required to keep train in top operating condition. Bachmann E-Z Lube or other hobby-grade lubricants are recommended.
Bachmann hopes you enjoy your train for many years to come!

Bachmann Industries CP Rail #5612 Diesel Locomotive Train
Bachmann Trains
Product description
Sd40-2 DCC sound value equipped diesel locomotive - CP rail #5612 (dual flags) - HO scale. The dependable, versatile 3, 000-hsp SD40-2 was one of EMD's best-selling engines. We have added a DCC sound-equipped version to our line of popular SD40-2 diesels. It includes our sound value SoundTraxx diesel sound package with prototypical Prime mover, 3 air horns, and bell—all in polyphonic 16-bit sound.
- DCC sound-equipped 67201 includes our sound value sound package with prototypical prime mover, 3 air horns, and bell—all in polyphonic 16-bit sound
- For use with all NMRA/ NEM Compliant DCC systems, Compatible with conventional dc-powered Layouts, programing on the main, 128 speed step control
- Operating headlight, die cast chassis, can motor, E-Z Mate Mark II couplers
- Performs best on 18" radius curves or greater
- HO scale 1: 87
Product features
Discover Everything Bachmann Trains Offers to Get Started in Model Railroading
Since 1833, Bachmann has been known for providing innovative design at a good value. We are now one of the world's largest distributor, by volume, of ready-to-run train sets, locomotives, track, and accessories. Bachmann is also the only train company to offer products in all five of the most popular scales: N, HO, On30, O, and Large Scale.
As a distributor of beloved Thomas & Friends products, Bachmann brings the adventures of Thomas the Tank Engine to life with a growing line of complete train sets, separate sale items, and accessories for children from 8 to 80-just add your imagination. Thomas & Friends is available in both HO and Large Scale.
Bachmann's exclusive snap-together E-Z Track System makes track setup quick, easy, and fun. Plasticville U.S.A. and SceneScapes buildings and accessories let you add the finishing touches for the perfect layout.
If You Are Purchasing a Train Set, It Will Include
- Locomotive
- Cars (Rolling Stock)E-
- Z Track – available in either black roadbed with steel alloy rail or gray roadbed with nickel silver rail
- Terminal/Rerailer
- Terminal Wire
- Speed Controller
- Power Supply
- List of Components
Track Assembly
- Decide where to set up your train – a dry, firm, flat surface works best!
- To make sure you have enough working room, make a test track layout by loosely placing track in desired configuration.
- The terminal/rerailer section will later be connected to a power pack and power supply, so place it near an outlet or power strip.
- Install under-track magnet, if your set comes with one. If your set does not come with one, magnets are available separately (HO Item No. 78999; N Scale Item No. 78998).
- Assemble the track by pushing together. Make sure the rail and joiners are seated properly. Be careful that the rail joiners do not slip under the rail without properly connecting. This can cause train derailments and electrical circuit interruptions.
- After track is assembled, double-check for joint connection and fit by lightly running your fingers over the top of the rails in both directions.
- If you detect bumps or distortion on the track surface, recheck the rail joiner fit.
Power Connections
- Power supply and speed control are plug and play; no tools are needed.
- Power is supplied to the track and the locomotive by the power supply, speed controller, terminal wire, and E-Z Track terminal/rerailer.
- First – turn knob on the speed controller counterclockwise until it stops (all the way to the left).
- Next – attach terminal wire to the speed controller by plugging it in where it says 'To Track.'
- Then – plug terminal wire into the E-Z Track terminal rerailer. Firmly push connector onto the track terminals.
- Finally – plug the connecting wire from the power supply into jack on the speed controller labeled 'IN'. Then plug power supply into a live wall outlet.
- Some sets may come with a speed controller with two push button connectors. These are used to supply AC power to accessories.
- To make positive and secure connections to these, push in buttons and insert each of the bare ends of the connection wire from your accessory.
- The speed controller is capable of powering one accessory at a time.
Putting the Train on the Track
- Put the locomotive on the track and run the wheels back and forth over the terminal rerailer track.
- When the wheels glide smoothly over the track, you know the wheels are all on the track. If your set comes with a tender, attach it to the locomotive.
- Add the rest of the cars that come with your set by placing them on the track and running them back and forth over the terminal rerailer until they glide smoothly. Then gently push the cars together – they will engage automatically.
- Do not try to connect cars when positioned over an under-track magnet.
How to Use E-Z Mate Couplers (HO and On30 Scale)
- Your set may be equipped with E-Z Mate magnetically operated knuckle couplers that let you perform real railroad switching and yard operations.
- Coupling two cars with E-Z Mate couplers is as easy as pushing them together when they are not over an under-track magnet.
- Uncoupling occurs only when over an under-track magnet and when there is no tension between the cars.
- To uncouple E-Z Mate couplers, stop two couplers directly over the under-track magnet. With no tension between the cars, the couplers will open automatically.
- If cars will not couple, check to be sure cars are not positioned over the uncoupling magnet or parked on a curve.
- If cars will not uncouple, check to be sure the couplers are positioned directly adjacent to the magnet position indicator and that the indicator is placed in line with the center line of the under-track magnet.
- Check that the magnet is secured to the underside of the track and fitted with the steel plate provided.
How to Run Your Train
- Turn the knob on the speed controller clockwise until it stops (all the way to the left).
- Plug in the power supply.
- Begin feeding power to the track by slowly turning the knob on the speed controller clockwise.
- Observe the direction of your train.
- If it moves backwards when the controls indicate forward, stop the train.
- Then simply disconnect, flip, and reconnect the terminal wire to the terminal rerailer track.
- Remember – never leave your train running unattended!
Action Checklist (Troubleshooting If Your Train Doesn’t Run or Stops Running)
- Is the power supply plugged in to a live receptacle?
- Are the wheels on the track?
- Is the wiring secure?
- Is the track properly assembled?
- Is the track properly seated in the rail joiner?
- If your train stops or fails to start, a short circuit may be indicated. If this is the case, Unplug the power supply immediately.
- Common reasons for a short circuit: derailed wheels may cause a short. Check to make sure all wheels are on the track. Also check all connections and make sure there is no metal of any sort across the rails.
- After checking everything carefully, resume operation.
- Please note, your power supply is protected by a circuit breaker that automatically resets after a short circuit is corrected.
- Allow up to 5 minutes for the circuit breaker to reset before resuming operation.
Keep Your Train in Top Operating Condition
- Works better after couple hours of break-in time.
- Train performs best under clean operating conditions.
- Clean wheels and a clean track ensure good electrical contact.
- After about every 8 hours of operation, wipe the track rails and exposed wheels with a soft, lint-free cloth.
- Removal of black residue is normal.
- Do not use steel wool to clean your track.
- Do not use common solvents, they may damage plastics - use track cleaner.
- After 24 hours of use, light lubrication is required to keep train in top operating condition. Bachmann E-Z Lube or other hobby-grade lubricants are recommended.
Bachmann hopes you enjoy your train for many years to come!
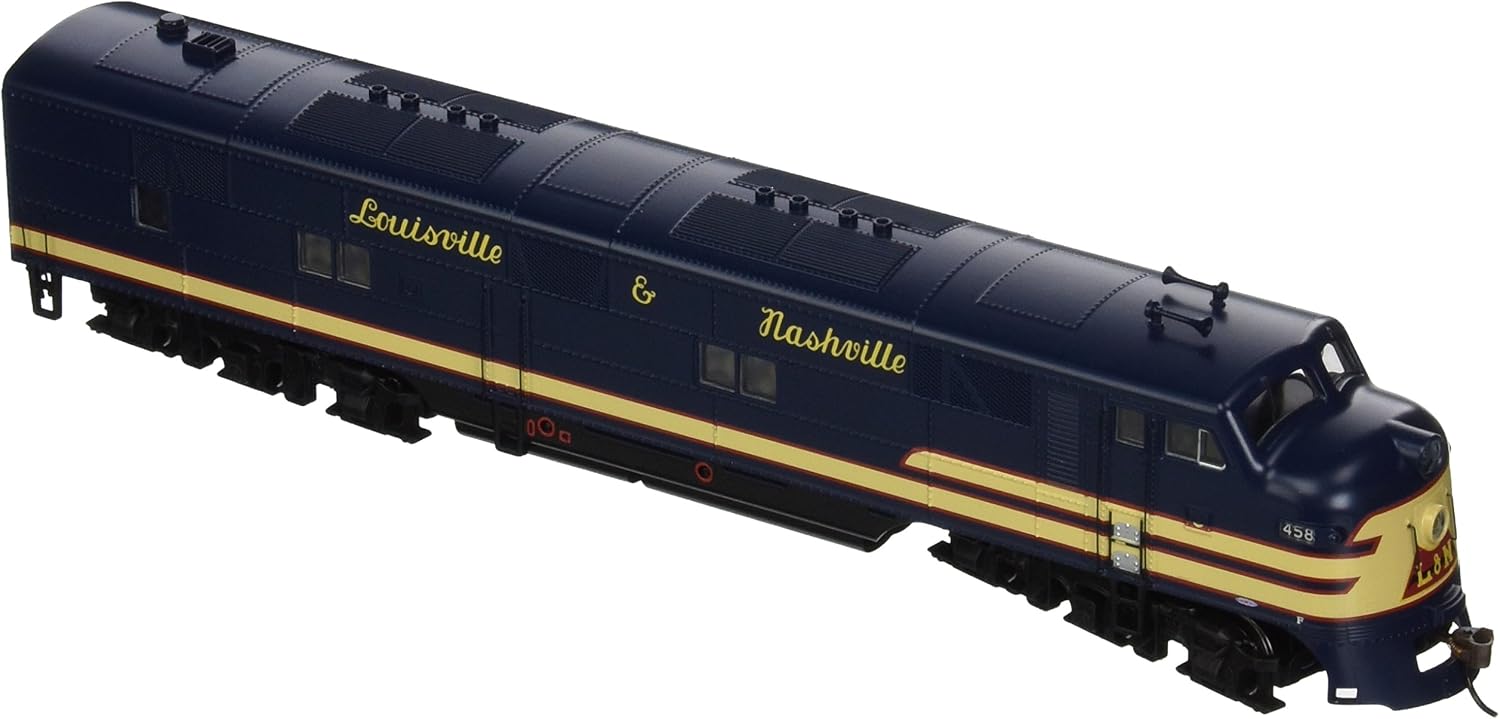
Bachmann Industries L&N #458 Diesel Locomotive Train
Bachmann Trains
Product description
EMD E7-A DCC Ready Diesel Locomotive - L&N #458 - HO Scale. Designed for high-speed passenger service, the first "E" series diesel was introduced by GM in 1937 and became one of the most popular passenger engines ever made. Bachmann is introducing a DCC-ready version that has an 8-pin socket ready for DCC decoder installation of your choice. Features include precision motor with dual flywheels, die-cast frame, all-wheel drive, illuminated number boards, operating LED double headlight (per prototype), RP25 wheel contours, and E-Z Mate Mark II couplers.
- Pre-wired factory-installed 8-pin socket for the DCC decoder installation of your choice. Decoders sold separately
- Compatible with conventional dc-powered Layouts
- Precision motor with dual Flywheels, die-cast frame, all-wheel drive, illuminated number boards, operating LED double headlight per prototype, RP25 wheel Contours, and E-Z Mate Mark II couplers.
- Performs best on 22" radius curves or greater
- HO scale 1: 87
Product features
Discover Everything Bachmann Trains Offers to Get Started in Model Railroading
Since 1833, Bachmann has been known for providing innovative design at a good value. We are now one of the world's largest distributor, by volume, of ready-to-run train sets, locomotives, track, and accessories. Bachmann is also the only train company to offer products in all five of the most popular scales: N, HO, On30, O, and Large Scale.
As a distributor of beloved Thomas & Friends products, Bachmann brings the adventures of Thomas the Tank Engine to life with a growing line of complete train sets, separate sale items, and accessories for children from 8 to 80-just add your imagination. Thomas & Friends is available in both HO and Large Scale.
Bachmann's exclusive snap-together E-Z Track System makes track setup quick, easy, and fun. Plasticville U.S.A. and SceneScapes buildings and accessories let you add the finishing touches for the perfect layout.
If You Are Purchasing a Train Set, It Will Include
- Locomotive
- Cars (Rolling Stock)
- E-Z Track – available in either black roadbed with steel alloy rail or gray roadbed with nickel silver rail
- Terminal/Rerailer
- Terminal Wire
- Speed Controller
- Power Supply
- List of Components
Track Assembly
- Decide where to set up your train – a dry, firm, flat surface works best!
- To make sure you have enough working room, make a test track layout by loosely placing track in desired configuration.
- The terminal/rerailer section will later be connected to a power pack and power supply, so place it near an outlet or power strip.
- Install under-track magnet, if your set comes with one. If your set does not come with one, magnets are available separately (HO Item No. 78999; N Scale Item No. 78998).
- Assemble the track by pushing together. Make sure the rail and joiners are seated properly. Be careful that the rail joiners do not slip under the rail without properly connecting. This can cause train derailments and electrical circuit interruptions.
- After track is assembled, double-check for joint connection and fit by lightly running your fingers over the top of the rails in both directions.
- If you detect bumps or distortion on the track surface, recheck the rail joiner fit.
Power Connections
- Power supply and speed control are plug and play; no tools are needed.
- Power is supplied to the track and the locomotive by the power supply, speed controller, terminal wire, and E-Z Track terminal/rerailer.
- First – turn knob on the speed controller counterclockwise until it stops (all the way to the left).
- Next – attach terminal wire to the speed controller by plugging it in where it says 'To Track.'
- Then – plug terminal wire into the E-Z Track terminal rerailer. Firmly push connector onto the track terminals.
- Finally – plug the connecting wire from the power supply into jack on the speed controller labeled 'IN'. Then plug power supply into a live wall outlet.
- Some sets may come with a speed controller with two push button connectors. These are used to supply AC power to accessories.
- To make positive and secure connections to these, push in buttons and insert each of the bare ends of the connection wire from your accessory.
- The speed controller is capable of powering one accessory at a time.
Putting the Train on the Track
- Put the locomotive on the track and run the wheels back and forth over the terminal rerailer track.
- When the wheels glide smoothly over the track, you know the wheels are all on the track. If your set comes with a tender, attach it to the locomotive.
- Add the rest of the cars that come with your set by placing them on the track and running them back and forth over the terminal rerailer until they glide smoothly. Then gently push the cars together – they will engage automatically.
- Do not try to connect cars when positioned over an under-track magnet.
How to Use E-Z Mate Couplers (HO and On30 Scale)
- Your set may be equipped with E-Z Mate magnetically operated knuckle couplers that let you perform real railroad switching and yard operations.
- Coupling two cars with E-Z Mate couplers is as easy as pushing them together when they are not over an under-track magnet.
- Uncoupling occurs only when over an under-track magnet and when there is no tension between the cars.
- To uncouple E-Z Mate couplers, stop two couplers directly over the under-track magnet. With no tension between the cars, the couplers will open automatically.
- If cars will not couple, check to be sure cars are not positioned over the uncoupling magnet or parked on a curve.
- If cars will not uncouple, check to be sure the couplers are positioned directly adjacent to the magnet position indicator and that the indicator is placed in line with the center line of the under-track magnet.
- Check that the magnet is secured to the underside of the track and fitted with the steel plate provided.
How to Run Your Train
- Turn the knob on the speed controller clockwise until it stops (all the way to the left).
- Plug in the power supply.
- Begin feeding power to the track by slowly turning the knob on the speed controller clockwise.
- Observe the direction of your train.
- If it moves backwards when the controls indicate forward, stop the train.
- Then simply disconnect, flip, and reconnect the terminal wire to the terminal rerailer track.
- Remember – never leave your train running unattended!
Action Checklist (Troubleshooting If Your Train Doesn’t Run or Stops Running)
- Is the power supply plugged in to a live receptacle?
- Are the wheels on the track?
- Is the wiring secure?
- Is the track properly assembled?
- Is the track properly seated in the rail joiner?
- If your train stops or fails to start, a short circuit may be indicated. If this is the case, Unplug the power supply immediately.
- Common reasons for a short circuit: derailed wheels may cause a short. Check to make sure all wheels are on the track. Also check all connections and make sure there is no metal of any sort across the rails.
- After checking everything carefully, resume operation.
- Please note, your power supply is protected by a circuit breaker that automatically resets after a short circuit is corrected.
- Allow up to 5 minutes for the circuit breaker to reset before resuming operation.
Keep Your Train in Top Operating Condition
- Works better after couple hours of break-in time.
- Train performs best under clean operating conditions.
- Clean wheels and a clean track ensure good electrical contact.
- After about every 8 hours of operation, wipe the track rails and exposed wheels with a soft, lint-free cloth.
- Removal of black residue is normal.
- Do not use steel wool to clean your track.
- Do not use common solvents, they may damage plastics - use track cleaner.
- After 24 hours of use, light lubrication is required to keep train in top operating condition. Bachmann E-Z Lube or other hobby-grade lubricants are recommended.
Bachmann hopes you enjoy your train for many years to come!

Bachmann Industries Union Pacific #989 Diesel Locomotive Train
Bachmann Trains
Product description
EMD e7-a DCC ready diesel locomotive - Union Pacific #989 - HO scale. Designed for high-speed passenger service, the first "e" series diesel was introduced by GM in 1937 and became one of the most popular passenger engines ever made. Bachmann is introducing a DCC-ready version that has an 8-pin socket ready for DCC decoder installation of your choice. Features include precision motor with dual flywheels, die-cast frame, all-wheel drive, illuminated number boards, operating LED double headlight (per prototype), RP25 wheel contours, and E-Z Mate mark II couplers.
- Pre-wired factory-installed 8-pin socket for the DCC decoder installation of your choice. Decoders sold separately
- Compatible with conventional dc-powered Layouts
- Precision motor with dual Flywheels, die-cast frame, all-wheel drive, illuminated number boards, operating LED double headlight per prototype, RP25 wheel Contours, and E-Z Mate Mark II couplers.
- Performs best on 22" radius curves or greater
- HO scale 1: 87
User questions & answers
| Question: | Will ti run on dc track as is |
| Answer: | The locomotive does not come with rails. |
Product features
Discover Everything Bachmann Trains Offers to Get Started in Model Railroading
Since 1833, Bachmann has been known for providing innovative design at a good value. We are now one of the world's largest distributor, by volume, of ready-to-run train sets, locomotives, track, and accessories. Bachmann is also the only train company to offer products in all five of the most popular scales: N, HO, On30, O, and Large Scale.
As a distributor of beloved Thomas & Friends products, Bachmann brings the adventures of Thomas the Tank Engine to life with a growing line of complete train sets, separate sale items, and accessories for children from 8 to 80-just add your imagination. Thomas & Friends is available in both HO and Large Scale.
Bachmann's exclusive snap-together E-Z Track System makes track setup quick, easy, and fun. Plasticville U.S.A. and SceneScapes buildings and accessories let you add the finishing touches for the perfect layout.
If You Are Purchasing a Train Set, It Will Include
- Locomotive
- Cars (Rolling Stock)
- E-Z Track – available in either black roadbed with steel alloy rail or gray roadbed with nickel silver rail
- Terminal/Rerailer
- Terminal Wire
- Speed Controller
- Power Supply
- List of Components
Track Assembly
- Decide where to set up your train – a dry, firm, flat surface works best!
- To make sure you have enough working room, make a test track layout by loosely placing track in desired configuration.
- The terminal/rerailer section will later be connected to a power pack and power supply, so place it near an outlet or power strip.
- Install under-track magnet, if your set comes with one. If your set does not come with one, magnets are available separately (HO Item No. 78999; N Scale Item No. 78998).
- Assemble the track by pushing together. Make sure the rail and joiners are seated properly. Be careful that the rail joiners do not slip under the rail without properly connecting. This can cause train derailments and electrical circuit interruptions.
- After track is assembled, double-check for joint connection and fit by lightly running your fingers over the top of the rails in both directions.
- If you detect bumps or distortion on the track surface, recheck the rail joiner fit.
Power Connections
- Power supply and speed control are plug and play; no tools are needed.
- Power is supplied to the track and the locomotive by the power supply, speed controller, terminal wire, and E-Z Track terminal/rerailer.
- First – turn knob on the speed controller counterclockwise until it stops (all the way to the left).
- Next – attach terminal wire to the speed controller by plugging it in where it says 'To Track.'
- Then – plug terminal wire into the E-Z Track terminal rerailer. Firmly push connector onto the track terminals.
- Finally – plug the connecting wire from the power supply into jack on the speed controller labeled 'IN'. Then plug power supply into a live wall outlet.
- Some sets may come with a speed controller with two push button connectors. These are used to supply AC power to accessories.
- To make positive and secure connections to these, push in buttons and insert each of the bare ends of the connection wire from your accessory.
- The speed controller is capable of powering one accessory at a time.
Putting the Train on the Track
- Put the locomotive on the track and run the wheels back and forth over the terminal rerailer track.
- When the wheels glide smoothly over the track, you know the wheels are all on the track. If your set comes with a tender, attach it to the locomotive.
- Add the rest of the cars that come with your set by placing them on the track and running them back and forth over the terminal rerailer until they glide smoothly. Then gently push the cars together – they will engage automatically.
- Do not try to connect cars when positioned over an under-track magnet.
How to Use E-Z Mate Couplers (HO and On30 Scale)
- Your set may be equipped with E-Z Mate magnetically operated knuckle couplers that let you perform real railroad switching and yard operations.
- Coupling two cars with E-Z Mate couplers is as easy as pushing them together when they are not over an under-track magnet.
- Uncoupling occurs only when over an under-track magnet and when there is no tension between the cars.
- To uncouple E-Z Mate couplers, stop two couplers directly over the under-track magnet. With no tension between the cars, the couplers will open automatically.
- If cars will not couple, check to be sure cars are not positioned over the uncoupling magnet or parked on a curve.
- If cars will not uncouple, check to be sure the couplers are positioned directly adjacent to the magnet position indicator and that the indicator is placed in line with the center line of the under-track magnet.
- Check that the magnet is secured to the underside of the track and fitted with the steel plate provided.
How to Run Your Train
- Turn the knob on the speed controller clockwise until it stops (all the way to the left).
- Plug in the power supply.
- Begin feeding power to the track by slowly turning the knob on the speed controller clockwise.
- Observe the direction of your train.
- If it moves backwards when the controls indicate forward, stop the train.
- Then simply disconnect, flip, and reconnect the terminal wire to the terminal rerailer track.
- Remember – never leave your train running unattended!
Action Checklist (Troubleshooting If Your Train Doesn’t Run or Stops Running)
- Is the power supply plugged in to a live receptacle?
- Are the wheels on the track?
- Is the wiring secure?
- Is the track properly assembled?
- Is the track properly seated in the rail joiner?
- If your train stops or fails to start, a short circuit may be indicated. If this is the case, Unplug the power supply immediately.
- Common reasons for a short circuit: derailed wheels may cause a short. Check to make sure all wheels are on the track. Also check all connections and make sure there is no metal of any sort across the rails.
- After checking everything carefully, resume operation.
- Please note, your power supply is protected by a circuit breaker that automatically resets after a short circuit is corrected.
- Allow up to 5 minutes for the circuit breaker to reset before resuming operation.
Keep Your Train in Top Operating Condition
- Works better after couple hours of break-in time.
- Train performs best under clean operating conditions.
- Clean wheels and a clean track ensure good electrical contact.
- After about every 8 hours of operation, wipe the track rails and exposed wheels with a soft, lint-free cloth.
- Removal of black residue is normal.
- Do not use steel wool to clean your track.
- Do not use common solvents, they may damage plastics - use track cleaner.
- After 24 hours of use, light lubrication is required to keep train in top operating condition. Bachmann E-Z Lube or other hobby-grade lubricants are recommended.
Bachmann hopes you enjoy your train for many years to come!

Bachmann Industries PRR #4890 Diesel Locomotive Train
Bachmann Trains
Product description
Gg-1 DCC ready electric locomotive - PRR #4890 - TUSCAN red 5 stripe - HO scale. The electric gg-1 was introduced in the 1930S by the Pennsylvania railroad, which needed a locomotive that could carry more rolling stock at greater speeds. Its dynamic streamlined design captured the public's imagination and made it the Star of countless movies and advertisements. This DCC-ready 65206 features include: all new tooling, die-cast frame, 12-wheel drive, twin operating metal pantographs that can be powered by overhead wire if desired, soft white LED directional headlights with dimming function, factory-installed 8-pin socket ready for DCC decoder installation of your choice, E-Z Mate mark II couplers.
- Pre-wired factory-installed 8-pin socket for the DCC decoder installation of your choice. Decoders sold separately
- Compatible with conventional dc-powered Layouts
- Die-cast frame, 12-wheel drive, twin operating metal pantographs that can be powered by overhead wire if desired
- Soft white LED directional headlights with dimming function, E-Z Mate Mark II couplers.
- Preforms best on 22" radius curves or greater, HO scale 1: 87
User questions & answers
| Question: | Would you pull passenger cars with it, or is it used mainly for rolling stock |
| Answer: | According to the decoder selector on Digitrax's site, there are both sound and non-sound DCC decoders designed for this model, all of which appear to be full circuit board replacements. |
Product features
Discover Everything Bachmann Trains Offers to Get Started in Model Railroading
Since 1833, Bachmann has been known for providing innovative design at a good value. We are now one of the world's largest distributor, by volume, of ready-to-run train sets, locomotives, track, and accessories. Bachmann is also the only train company to offer products in all five of the most popular scales: N, HO, On30, O, and Large Scale.
As a distributor of beloved Thomas & Friends products, Bachmann brings the adventures of Thomas the Tank Engine to life with a growing line of complete train sets, separate sale items, and accessories for children from 8 to 80-just add your imagination. Thomas & Friends is available in both HO and Large Scale.
Bachmann's exclusive snap-together E-Z Track System makes track setup quick, easy, and fun. Plasticville U.S.A. and SceneScapes buildings and accessories let you add the finishing touches for the perfect layout.
If You Are Purchasing a Train Set, It Will Include
- Locomotive
- Cars (Rolling Stock)
- E-Z Track – available in either black roadbed with steel alloy rail or gray roadbed with nickel silver rail
- Terminal/Rerailer
- Terminal Wire
- Speed Controller
- Power Supply
- List of Components
Track Assembly
- Decide where to set up your train – a dry, firm, flat surface works best!
- To make sure you have enough working room, make a test track layout by loosely placing track in desired configuration.
- The terminal/rerailer section will later be connected to a power pack and power supply, so place it near an outlet or power strip.
- Install under-track magnet, if your set comes with one. If your set does not come with one, magnets are available separately (HO Item No. 78999; N Scale Item No. 78998).
- Assemble the track by pushing together. Make sure the rail and joiners are seated properly. Be careful that the rail joiners do not slip under the rail without properly connecting. This can cause train derailments and electrical circuit interruptions.
- After track is assembled, double-check for joint connection and fit by lightly running your fingers over the top of the rails in both directions.
- If you detect bumps or distortion on the track surface, recheck the rail joiner fit.
Power Connections
- Power supply and speed control are plug and play; no tools are needed.
- Power is supplied to the track and the locomotive by the power supply, speed controller, terminal wire, and E-Z Track terminal/rerailer.
- First – turn knob on the speed controller counterclockwise until it stops (all the way to the left).
- Next – attach terminal wire to the speed controller by plugging it in where it says 'To Track.'
- Then – plug terminal wire into the E-Z Track terminal Rerailer. Firmly push connector onto the track terminals.
- Finally – plug the connecting wire from the power supply into jack on the speed controller labeled 'IN.' Then plug power supply into a live wall outlet.
- Some sets may come with a speed controller with two push button connectors. These are used to supply AC power to accessories.
- To make positive and secure connections to these, push in buttons and insert each of the bare ends of the connection wire from your accessory.
- The speed controller is capable of powering one accessory at a time.
Putting the Train on the Track
- Put the locomotive on the track and run the wheels back and forth over the terminal rerailer track.
- When the wheels glide smoothly over the track, you know the wheels are all on the track. If your set comes with a tender, attach it to the locomotive.
- Add the rest of the cars that come with your set by placing them on the track and running them back and forth over the terminal Rerailer until they glide smoothly. Then gently push the cars together – they will engage automatically.
- Do not try to connect cars when positioned over an under-track magnet.
How to Use E-Z Mate Couplers (HO and On30 Scale)
- Your set may be equipped with E-Z Mate magnetically operated knuckle couplers that let you perform real railroad switching and yard operations.
- Coupling two cars with E-Z Mate couplers is as easy as pushing them together when they are not over an under-track magnet.
- Uncoupling occurs only when over an under-track magnet and when there is no tension between the cars.
- To uncouple E-Z Mate couplers, stop two couplers directly over the under-track magnet. With no tension between the cars, the couplers will open automatically.
- If cars will not couple, check to be sure cars are not positioned over the uncoupling magnet or parked on a curve.
- If cars will not uncouple, check to be sure the couplers are positioned directly adjacent to the magnet position indicator and that the indicator is placed in line with the center line of the under-track magnet.
- Check that the magnet is secured to the underside of the track and fitted with the steel plate provided.
How to Run Your Train
- Turn the knob on the speed controller clockwise until it stops (all the way to the left).
- Plug in the power supply.
- Begin feeding power to the track by slowly turning the knob on the speed controller clockwise.
- Observe the direction of your train.
- If it moves backwards when the controls indicate forward, stop the train.
- Then simply disconnect, flip, and reconnect the terminal wire to the terminal Rerailer track.
- Remember – never leave your train running unattended!
Action Checklist (Troubleshooting If Your Train Doesn’t Run or Stops Running)
- Is the power supply plugged in to a live receptacle?
- Are the wheels on the track?
- Is the wiring secure?
- Is the track properly assembled?
- Is the track properly seated in the rail joiner?
- If your train stops or fails to start, a short circuit may be indicated. If this is the case, Unplug The Power Supply Immediately.
- Common reasons for a short circuit: derailed wheels may cause a short. Check to make sure all wheels are on the track. Also check all connections and make sure there is no metal of any sort across the rails.
- After checking everything carefully, resume operation.
- Please note, your power supply is protected by a circuit breaker that automatically resets after a short circuit is corrected.
- Allow up to 5 minutes for the circuit breaker to reset before resuming operation.
Keep Your Train in Top Operating Condition
- Works better after couple hours of break-in time.
- Train performs best under clean operating conditions.
- Clean wheels and a clean track ensure good electrical contact.
- After about every 8 hours of operation, wipe the track rails and exposed wheels with a soft, lint-free cloth.
- Removal of black residue is normal.
- Do not use steel wool to clean your track.
- Do not use common solvents, they may damage plastics - use track cleaner.
- After 24 hours of use, light lubrication is required to keep train in top operating condition. Bachmann E-Z Lube or other hobby-grade lubricants are recommended.
Bachmann hopes you enjoy your train for many years to come!
Latest Reviews
View all
4 Year Old Boy Books
- Updated: 13.02.2023
- Read reviews
Design Originals Mops
- Updated: 24.05.2023
- Read reviews

Ads
- Updated: 07.01.2023
- Read reviews

Cat Beds
- Updated: 21.01.2023
- Read reviews

Shakespeare Fishing Rod And Reel Combos
- Updated: 23.04.2023
- Read reviews