6 best scale powers

Bachmann Trains 44211 Power Pack with Speed Controller Train Toy
Bachmann Trains
Product description
Power pack W/speed controller. Our power pack and speed controller is appropriate for use with N, HO, and On30 scale DC (analog) trains.
- Appropriate for N, HO, and On30 scale trains
- Includes power pack & control
- Includes speed control knob
- Includes direction control switch
User questions & answers
| Question: | What does it mean when a locomotive is dcc equipped? Can this controller work with a dcc equipped locomotive |
| Answer: | Yup. XL black & std color ink cartridges. Using in WF7720 & had no issues installing or using so far (admittedly w low print volume). Your mileage may vary. |
| Question: | I have 3 4x8 sheets of plywood for my layout and right now running 2 trains .i would like to make it one bigger single run how big a controller do i n |
| Answer: | No it's not compatible. This is ONLY comparable to the Sawgrass sublimation printer. |
| Question: | Does this have ac and dc outputs |
| Answer: | It really depends on the design and/or size of the design. We are still on the ink that came with the printer. We have done around 60 prints so far. |
| Question: | Is this able to control more accessories while controlling the train, or just one thing can be operated wth this |
| Answer: | My store has RICOH 3110DNW sublimation ink for sale, you can search for it. |
| Question: | My espon wf3640 but the ink is 252 does it work in my espon printer |
| Answer: | It can not need ICC configuration file, if you need ICC configuration file, I can send you by email |
| Question: | Will this work on Epson WF |
| Answer: | Yes, I have used it on my Canon Pixma G6020 printers. Very satisfied and recommended. |
| Question: | Will this work with epson wf |
| Answer: | I have used it in my pixma g5020. It works well and the colors are bright.I think that the quality no difference from the original ink. |
| Question: | I used dye ink in my epson printer wf3620 instead of pigment ink. why did it leave all kinds of thin black lines on the paper like the ink is to thin |
| Answer: | Yes, it is really easy to refill. |
Product features
Discover Everything Bachmann Trains Offers to Get Started in Model Railroading
Since 1833, Bachmann has been known for providing innovative design at a good value. We are now one of the world's largest distributor, by volume, of ready-to-run train sets, locomotives, track, and accessories. Bachmann is also the only train company to offer products in all five of the most popular scales: N, HO, On30, O, and Large Scale.
As a distributor of beloved Thomas & Friends products, Bachmann brings the adventures of Thomas the Tank Engine to life with a growing line of complete train sets, separate sale items, and accessories for children from 8 to 80-just add your imagination. Thomas & Friends is available in both HO and Large Scale.
Bachmann's exclusive snap-together E-Z Track System makes track setup quick, easy, and fun. Plasticville U.S.A. and SceneScapes buildings and accessories let you add the finishing touches for the perfect layout.
If You Are Purchasing a Train Set, It Will Include
- Locomotive
- Cars (Rolling Stock)
- E-Z Track – available in either black roadbed with steel alloy rail or gray roadbed with nickel silver rail
- Terminal/Rerailer
- Terminal Wire
- Speed Controller
- Power Supply
- List of Components
Track Assembly
- Decide where to set up your train – a dry, firm, flat surface works best!
- To make sure you have enough working room, make a test track layout by loosely placing track in desired configuration.
- The terminal/ Rerailer section will later be connected to a power pack and power supply, so place it near an outlet or power strip.
- Install under-track magnet, if your set comes with one. If your set does not come with one, magnets are available separately (HO Item No. 78999; N Scale Item No. 78998).
- Assemble the track by pushing together. Make sure the rail and joiners are seated properly. Be careful that the rail joiners do not slip under the rail without properly connecting. This can cause train derailments and electrical circuit interruptions.
- After track is assembled, double-check for joint connection and fit by lightly running your fingers over the top of the rails in both directions.
- If you detect bumps or distortion on the track surface, recheck the rail joiner fit.
Power Connections
- Power supply and speed control are plug and play; no tools are needed.
- Power is supplied to the track and the locomotive by the power supply, speed controller, terminal wire, and E-Z Track terminal/rerailer.
- First – turn knob on the speed controller counterclockwise until it stops (all the way to the left).
- Next – attach terminal wire to the speed controller by plugging it in where it says 'To Track'.
- Then – plug terminal wire into the E-Z Track terminal rerailer. Firmly push connector onto the track terminals.
- Finally – plug the connecting wire from the power supply into jack on the speed controller labeled 'IN'. Then plug power supply into a live wall outlet.
- Some sets may come with a speed controller with two push button connectors. These are used to supply AC power to accessories.
- To make positive and secure connections to these, push in buttons and insert each of the bare ends of the connection wire from your accessory.
- The speed controller is capable of powering one accessory at a time.
Putting the Train on the Track
- Put the locomotive on the track and run the wheels back and forth over the terminal Rerailer track.
- When the wheels glide smoothly over the track, you know the wheels are all on the track. If your set comes with a tender, attach it to the locomotive.
- Add the rest of the cars that come with your set by placing them on the track and running them back and forth over the terminal rerailer until they glide smoothly. Then gently push the cars together – they will engage automatically.
- Do not try to connect cars when positioned over an under-track magnet.
How to Use E-Z Mate Couplers (HO and On30 Scale)
- Your set may be equipped with E-Z Mate magnetically operated knuckle couplers that let you perform real railroad switching and yard operations.
- Coupling two cars with E-Z Mate couplers is as easy as pushing them together when they are not over an under-track magnet.
- Uncoupling occurs only when over an under-track magnet and when there is no tension between the cars.
- To uncouple E-Z Mate couplers, stop two couplers directly over the under-track magnet. With no tension between the cars, the couplers will open automatically.
- If cars will not couple, check to be sure cars are not positioned over the uncoupling magnet or parked on a curve.
- If cars will not uncouple, check to be sure the couplers are positioned directly adjacent to the magnet position indicator and that the indicator is placed in line with the center line of the under-track magnet.
- Check that the magnet is secured to the underside of the track and fitted with the steel plate provided.
How to Run Your Train
- Turn the knob on the speed controller clockwise until it stops (all the way to the left).
- Plug in the power supply.
- Begin feeding power to the track by slowly turning the knob on the speed controller clockwise.
- Observe the direction of your train.
- If it moves backwards when the controls indicate forward, stop the train.
- Then simply disconnect, flip, and reconnect the terminal wire to the terminal Rerailer track.
- Remember – never leave your train running unattended!
Action Checklist (Troubleshooting If Your Train Doesn’t Run or Stops Running)
- Is the power supply plugged in to a live receptacle?
- Are the wheels on the track?
- Is the wiring secure?
- Is the track properly assembled?
- Is the track properly seated in the rail joiner?
- If your train stops or fails to start, a short circuit may be indicated. If this is the case, UNPLUG THE POWER SUPPLY IMMEDIATELY.
- Common reasons for a short circuit: derailed wheels may cause a short. Check to make sure all wheels are on the track. Also check all connections and make sure there is no metal of any sort across the rails.
- After checking everything carefully, resume operation.
- Please note, your power supply is protected by a circuit breaker that automatically resets after a short circuit is corrected.
- Allow up to 5 minutes for the circuit breaker to reset before resuming operation.
Keep Your Train in Top Operating Condition
- Works better after couple hours of break-in time.
- Train performs best under clean operating conditions.
- Clean wheels and a clean track ensure good electrical contact.
- After about every 8 hours of operation, wipe the track rails and exposed wheels with a soft, lint-free cloth.
- Removal of black residue is normal.
- Do Not Use Steel Wool To Clean Your Track.
- Do not use common solvents, they may damage plastics - use track cleaner.
- After 24 hours of use, light lubrication is required to keep train in top operating condition. Bachmann E-Z Lube or other hobby-grade lubricants are recommended.
Bachmann hopes you enjoy your train for many years to come!

UpBright 12V AC/DC Adapter Compatible with CAS YS21 S-2000JR S2000JR ER JR EB ED PB FJ-SW1201250E FKS308HSC-1201250E PA-120150SN Computing Scale JF024WR-1200125UH 12VDC 1.25A Power Supply Cord Charger
Product description
UpBright New Global 12V AC / DC Adapter Compatible with CAS S-2000JR S2000JR S2000JR, ER JR, ED, PB Models FJ-SW1201250E FKS308HSC-1201250E PA-120150SN JF024WR-1200125UH JFEC FJSW1201250E FKS308HSC1201250E PA120150SN JF024WR1200125UH Pole Price Computing Scale 12VDC 1.25A 1.5A - 2A DC12V 1250mA 1500mA 12.0V 12 V 12 VDC Switching Power Supply Cord Cable PS Wall Home Battery Charger Mains PSU CECCCROHS 100-240
- World Wide Input Voltage 100-240VAC 50/60Hz. OVP, OCP, SCP Protection (OVP: Over Voltage output Protection. OCP: Over Current output Protection. SCP: Short Circuit output Protection). Tested Units. In Great Working Condition. UpBright 30 days money back guarantee. 1 full year service warranty.
- UpBright New Global 12V AC / DC Adapter Compatible with CAS S-2000JR S2000JR S2000JR, ER JR, ED, PB Models FJ-SW1201250E FKS308HSC-1201250E PA-120150SN JF024WR-1200125UH JFEC FJSW1201250E FKS308HSC1201250E PA120150SN JF024WR1200125UH Pole Price Computing Scale 12VDC 1.25A 1.5A - 2A DC12V 1250mA 1500mA 12.0V 12 V 12 VDC Switching Power Supply Cord Cable PS Wall Home Battery Charger Mains PSU
- Compatible with: CAS Corporation Scales YS21 For Cas EB, PB & ED Series EB-60 EB-150/300 EB-150 EB-300 EB-60LB EB-150LB EB-300LB PB-30 PB-60 PB-30LB PB-60LB PB-150 PB-300 PB-500 PB-150LB PB-300LB PB-500LB ED-6 ED-15 ED-30 ED-60 ED6 ED15 ED30 ED60 Portable Bench Scale Power Supply; CAS Corporation Co, LTD. Model FKS305HSC-1201250U FKS305HSC1201250U 12VDC 1250mA Switching Power Supply
- Compatible with: CAS S-2000JR15LB S2JR15 S2JR15V S2JR15VP S2JR15L S2JR15LP S-2000JR30LB S2JR30 S2JR30V S2JR30VP S2JR30L S2JR30LB S2JR30LP S-2000JR60LB S2JR60 S2JR60V S2JR60VP S2JR60L S2JR60LP Price Computing Scale

Bachmann Trains E-Z TRACK ELECTRONIC AUTO-REVERSING SYSTEM - NICKEL SILVER E-Z TRACK With Grey Roadbed - HO Scale
Bachmann Trains
Product description
Bachmann Trains E-Z TRACK ELECTRONIC AUTO-REVERSING SYSTEM - NICKEL SILVER E-Z TRACK With Grey Roadbed - HO Scale. Featuring our electronic auto-reversing E-Z Track, this track set is the perfect solution for point-to-point passenger and freight transit on your layout. A variable speed controller lets you determine the speed of travel. Add-on sections are also available (Item Nos. 44548 & 44549). The Nickel Silver E-Z Track Auto-Reversing Track System includes: 4 pieces of 9” straight auto-reversing E-Z Track, 4 pieces of 18” radius curved auto-reversing E-Z Track, 2pieces of 9” straight E-Z Track, 2 Hayes bumpers, power pack and variable speed controller, illustrated instructions
From the Manufacturer
Featuring our electronic auto-reversing E-Z Track System, this track set is the perfect solution for point to point passenger and freight transit on your layout. Set Includes, 4 - straight auto reversing tracks, 4 - radius curve auto reversing tracks, 2 - straight tracks, 2 Hayes bumpers, power pack and veriable speed controller. Nickel Silver rail with Gray roadbed. E-Z track system--snaps together, stays together on floors, tables and carpets. No nails, screws or special tools needed. Modeled from AAR track engineering dimensions.
- Set Includes, 4 - straight auto reversing tracks, 4 - radius curve auto reversing tracks, 2 - straight tracks, 2 Hayes bumpers, power pack and variable speed controller
- Trolley Car Not Included – Sold Separately
- Perfect Solution for Point-to-Point Travel on Your Layout
- Nickel Silver Rail with Gray Roadbed
- HO Scale 1:87
User questions & answers
| Question: | My trolly still runs evn though I turn the control all the way down, is this normal |
| Answer: | I used this product for HO and the trees are a bit small. Noch claims it to be for all scales, but I think it works well for HO and smaller |
| Question: | I bought this item and am very pleased with it. Has anyone come up with any track plan options beyond the standard straight with curves using additional track and maybe switches |
| Answer: | Hi Ron,you can systematically expand your layout of 81864 with 8192 and 8193. But you have to use 8192 first or both (8192 and 8193) together, but 8193 without 8192 will not work.Best regards |
| Question: | Do you need a terminal to go with this |
| Answer: | The track is a 6 inch x 4 inch oval the base is 8x6 inches. |
| Question: | All the tracks have the black underside with wiring except two straingt pieces that look like regualr E Z track so how does this work |
| Answer: | approx 6inch x 4 x1 |
Product features
Discover Everything Bachmann Trains Offers to Get Started in Model Railroading
Since 1833, Bachmann has been known for providing innovative design at a good value. We are now one of the world's largest distributor, by volume, of ready-to-run train sets, locomotives, track, and accessories. Bachmann is also the only train company to offer products in all five of the most popular scales: N, HO, On30, O, and Large Scale.
As a distributor of beloved Thomas & Friends products, Bachmann brings the adventures of Thomas the Tank Engine to life with a growing line of complete train sets, separate sale items, and accessories for children from 8 to 80-just add your imagination. Thomas & Friends is available in both HO and Large Scale.
Bachmann's exclusive snap-together E-Z Track System makes track setup quick, easy, and fun. Plasticville U.S.A. and SceneScapes buildings and accessories let you add the finishing touches for the perfect layout.
If You Are Purchasing a Train Set, It Will Include
- Locomotive
- Cars (Rolling Stock)
- E-Z Track – available in either black roadbed with steel alloy rail or gray roadbed with nickel silver rail
- Terminal/Rerailer
- Terminal Wire
- Speed Controller
- Power Supply
- List of Components
Track Assembly
- Decide where to set up your train – a dry, firm, flat surface works best!
- To make sure you have enough working room, make a test track layout by loosely placing track in desired configuration.
- The terminal/rerailer section will later be connected to a power pack and power supply, so place it near an outlet or power strip.
- Install under-track magnet, if your set comes with one. If your set does not come with one, magnets are available separately (HO Item No. 78999; N Scale Item No. 78998).
- Assemble the track by pushing together. Make sure the rail and joiners are seated properly. Be careful that the rail joiners do not slip under the rail without properly connecting. This can cause train derailments and electrical circuit interruptions.
- After track is assembled, double-check for joint connection and fit by lightly running your fingers over the top of the rails in both directions.
- If you detect bumps or distortion on the track surface, recheck the rail joiner fit.
Power Connections
- Power supply and speed control are plug and play; no tools are needed.
- Power is supplied to the track and the locomotive by the power supply, speed controller, terminal wire, and E-Z Track terminal/rerailer.
- First – turn knob on the speed controller counterclockwise until it stops (all the way to the left).
- Next – attach terminal wire to the speed controller by plugging it in where it says 'To Track'.
- Then – plug terminal wire into the E-Z Track terminal rerailer. Firmly push connector onto the track terminals.
- Finally – plug the connecting wire from the power supply into jack on the speed controller labeled 'In'. Then plug power supply into a live wall outlet.
- Some sets may come with a speed controller with two push button connectors. These are used to supply AC power to accessories.
- To make positive and secure connections to these, push in buttons and insert each of the bare ends of the connection wire from your accessory.
- The speed controller is capable of powering one accessory at a time.
Putting the Train on the Track
- Put the locomotive on the track and run the wheels back and forth over the terminal rerailer track.
- When the wheels glide smoothly over the track, you know the wheels are all on the track. If your set comes with a tender, attach it to the locomotive.
- Add the rest of the cars that come with your set by placing them on the track and running them back and forth over the terminal rerailer until they glide smoothly. Then gently push the cars together – they will engage automatically.
- Do not try to connect cars when positioned over an under-track magnet.
How to Use E-Z Mate Couplers (HO and On30 Scale)
- Your set may be equipped with E-Z Mate magnetically operated knuckle couplers that let you perform real railroad switching and yard operations.
- Coupling two cars with E-Z Mate couplers is as easy as pushing them together when they are not over an under-track magnet.
- Uncoupling occurs only when over an under-track magnet and when there is no tension between the cars.
- To uncouple E-Z Mate couplers, stop two couplers directly over the under-track magnet. With no tension between the cars, the couplers will open automatically.
- If cars will not couple, check to be sure cars are not positioned over the uncoupling magnet or parked on a curve.
- If cars will not uncouple, check to be sure the couplers are positioned directly adjacent to the magnet position indicator and that the indicator is placed in line with the center line of the under-track magnet.
- Check that the magnet is secured to the underside of the track and fitted with the steel plate provided.
How to Run Your Train
- Turn the knob on the speed controller clockwise until it stops (all the way to the left).
- Plug in the power supply.
- Begin feeding power to the track by slowly turning the knob on the speed controller clockwise.
- Observe the direction of your train.
- If it moves backwards when the controls indicate forward, stop the train.
- Then simply disconnect, flip, and reconnect the terminal wire to the terminal rerailer track.
- Remember – never leave your train running unattended!
Action Checklist (Troubleshooting If Your Train Doesn’t Run or Stops Running)
- Is the power supply plugged in to a live receptacle?
- Are the wheels on the track?
- Is the wiring secure?
- Is the track properly assembled?
- Is the track properly seated in the rail joiner?
- If your train stops or fails to start, a short circuit may be indicated. If this is the case, Unplug The Power Supply Immediately.
- Common reasons for a short circuit: derailed wheels may cause a short. Check to make sure all wheels are on the track. Also check all connections and make sure there is no metal of any sort across the rails.
- After checking everything carefully, resume operation.
- Please note, your power supply is protected by a circuit breaker that automatically resets after a short circuit is corrected.
- Allow up to 5 minutes for the circuit breaker to reset before resuming operation.
Keep Your Train in Top Operating Condition
- Works better after couple hours of break-in time.
- Train performs best under clean operating conditions.
- Clean wheels and a clean track ensure good electrical contact.
- After about every 8 hours of operation, wipe the track rails and exposed wheels with a soft, lint-free cloth.
- Removal of black residue is normal.
- Do Not Use Steel Wool To Clean Your Track.
- Do not use common solvents, they may damage plastics - use track cleaner.
- After 24 hours of use, light lubrication is required to keep train in top operating condition. Bachmann E-Z Lube or other hobby-grade lubricants are recommended.
Bachmann hopes you enjoy your train for many years to come!

Komelon 4930IM The Professional 30-Foot Inch/Metric Scale Power Tape, Yellow
Komelon
Product description
The Professional inch/Metric series offers a high quality line of tape measures. The line features a 12 ft./3.5m x 5/8-inch, 16ft./5m x 3/4-inch, 25ft./7.5m x 1-inch, and 30ft./9m x 1-inch tape measures. The Professional inch/Metric series offers an ergonomically designed case and superior internal mechanisms insuring smooth operating. This is the ideal tape measure for anyone using a metric measuring scale.
- Impact resistant case.
- The blade graduations are printed in both inch and metric scale.
- Nylon coated blade for maximum durability.
- Ergonomically designed chrome case
- Superior internal mechanism provides smooth operation
- Nylon coated blade for maximum durability
User questions & answers
| Question: | What is the stand out length? How far out will it stay stiff before bending |
| Answer: | No, this epson 664 ink refills through Micron-3 Stage Filtration to Reduce Printhead Clogging. |
| Question: | What is the exact dimension (diameter) of the label on the side |
| Answer: | It may or may not, its really at your own risk. I purchased these for my Epson 3620 and now the machine doesn't print correctly if at all. I strongly suggest just paying the premium for the Epson brand for safety. |
| Question: | Does it show 1/32's at all (at least up to 12")? Thanks |
| Answer: | Thank you for your question. We don't have this color combo for sell currently and we had sent your advice to our marketing team to take into consideration. Please keep eyes on our listing page. |
| Question: | Do you know if the measuring tape is made in u.s.a |
| Answer: | Be sure you tear off the tape that indicates to pull it off. It's an air port. Don't tear the round seal at the print head. |

Komelon 4912IM The Professional 12-Foot Inch/Metric Scale Power Tape, Yellow
Komelon
Product description
Komelon 4912IM The Professional 12-Foot Inch/Metric Scale Power Tape, Yellow
From the Manufacturer
The Komelon 4912IM The Professional 12-Foot Inch/Metric Scale Power Tape comes from a high quality line of tape measures. The line features a 12 ft./3.5m x 5/8-inch, 16ft./5m x 3/4-inch, 25ft./7.5m x 1-inch, and 30ft./9m x 1-inch tape measures. The Professional inch/Metric series offers an ergonomically designed case and superior internal mechanisms insuring smooth operating. This is the ideal tape measure for anyone using a metric measuring scale.
- Tough enough for the toughest contractor, these tapes feature superior blade extension
- This item belongs to tape-measures
- Item is manufactured in China
- The ideal tape measure for anyone using a metric measuring scale
- Ergonomically designed chrome case
- Superior internal mechanism provides smooth operation
- Nylon coated blade for maximum durability
User questions & answers
| Question: | Is there a belt clip |
| Answer: | Of course. You can either use VH-80 as bilateral or single sided by setting measuring mode. Thank you. |
| Question: | How has the locking mechanism held up over time |
| Answer: | Sure, if you measure the width and length of the swimming pool in Area mode, vh-80 will automatically multiply values and show square footage. To get square footage, make sure that you are measuring swimming pool in feet not m unit. Keep in mind that VH-80 is only designed for calculating triangle and square area. About freeform area you might not be able to get a result you expected. Thank you for your attention about our product. |
| Question: | Does this include fractional inch marks? The picture suggests there are none |
| Answer: | Thank you for asking! It gives you a complete line as you can find in the 4th main photo in the listing. If you try to measure from one wall to the opposite wall, it gives you a complete line. I hope the answer is helpful. |
| Question: | does it have the Mm and Inch measurement |
| Answer: | Yes the batteries are replaceable (important to me), and it does offer CM & MM, Inches, Feet (w/Fractions), and Feet (w/Decimal 1/10"). So far it meets, even exceeds my expectations. |
Bachmann Industries Large "G" Scale Brass Power Connector
Bachmann Trains
Product description
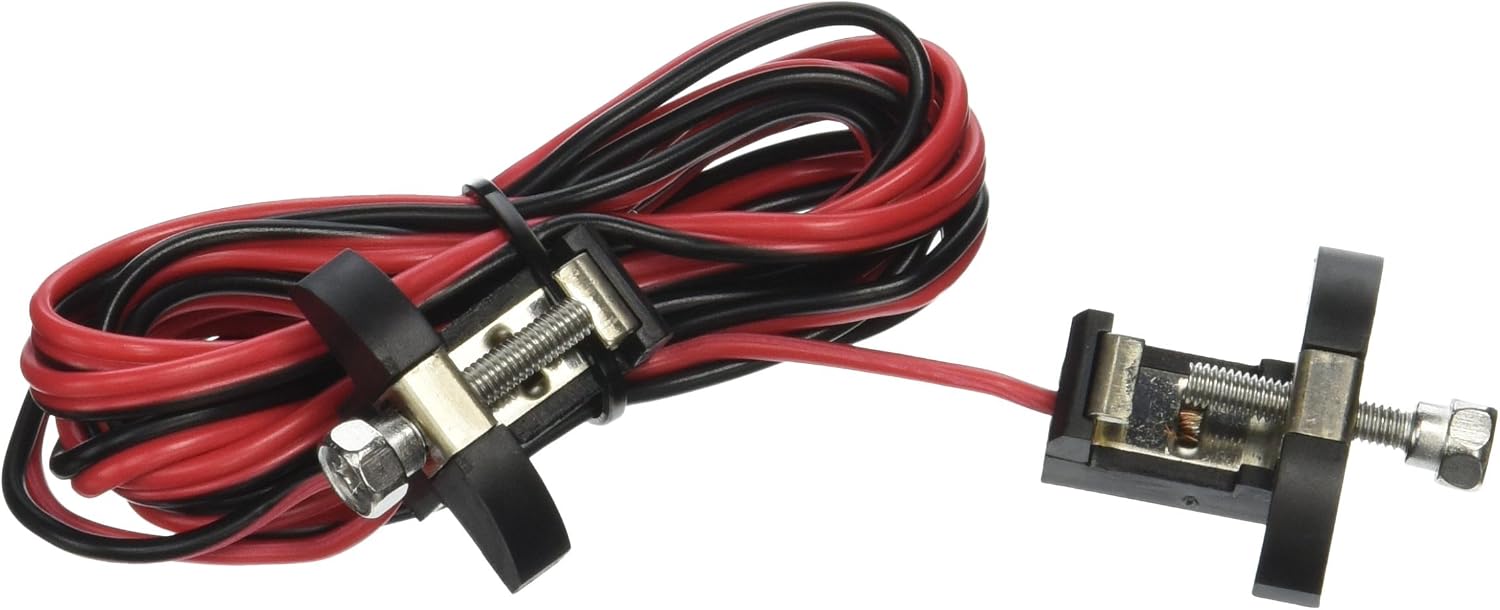
Brass POWER CONNECTOR - Large "G" Scale. Connects power to all Code 332 track with screw clamps. For indoor and outdoor use.
- For use with Bachmann Brass Track as well as other popular brands
- For use with Code 332 Brass Track
- Large "G" Scale Size
- Recommended for ages 14 years old & up
User questions & answers
| Question: | How long is did wire |
| Answer: | 1; often I inserted a cartridge on sale, not work. Sent back got new one. or tried more with one I had. Finally worked. 2: tried few times. checked if connected wireless to computer etc. Too, often said but worked printing anyway. Hope helps. |
| Question: | Will these work for the Steel Alloy Large G Scale tracks? Or is it just for the Brass |
| Answer: | No |
| Question: | What gauge is the wire |
| Answer: | I waited until the ink is all the way down. When the printout started to fade out then I added to new ones. Make sure to clean the printer head. If not, a streak of lines will appear on the printout. The trick of cleaning the printer head as follows: 1) lift the printer cover- turn off the printer- pressing the off button when the printer head is halfway- unplugthe wire so the printer head stops in the middle 2) move the printer head manually all the way to the left- do it slowly so not to damage the printer head 3) take a bounty paper tower and fold it about an inch. 4) use hydro peroxide and wet the paper towel and squeeze slowly so it will be Wet enough that it’s not dripping 5) place it in the path of the printer head and move the printer head slowly from left to right- about 10 times- repeat This about 3 times ( changing a new paper towel each time) 6) let it dry for about 29 minutes- plug the wire and turn the printer on 7) go to settings and run the clean printer head and do a test print- make sure all the color line prints clearly 8) print a sample page- if printout is good - congratulations! If not repeat steps above. Hope this helps :) |
| Question: | does it use a 3.5 jack to connect to the controller |
| Answer: | Yes, this epson t664 ink print outs have looked pretty sharp so far, don't see any problems with the colors either. |
Product features
Discover Everything Bachmann Trains Offers to Get Started in Model Railroading
Since 1833, Bachmann has been known for providing innovative design at a good value. We are now one of the world's largest distributor, by volume, of ready-to-run train sets, locomotives, track, and accessories. Bachmann is also the only train company to offer products in all five of the most popular scales: N, HO, On30, O, and Large Scale.
As a distributor of beloved Thomas & Friends products, Bachmann brings the adventures of Thomas the Tank Engine to life with a growing line of complete train sets, separate sale items, and accessories for children from 8 to 80-just add your imagination. Thomas & Friends is available in both HO and Large Scale.
Bachmann's exclusive snap-together E-Z Track System makes track setup quick, easy, and fun. Plasticville U.S.A. and SceneScapes buildings and accessories let you add the finishing touches for the perfect layout.
If You Are Purchasing a Train Set, It Will Include
- Locomotive
- Cars (Rolling Stock)
- E-Z Track – available in either black roadbed with steel alloy rail or gray roadbed with nickel silver rail
- Terminal/Rerailer
- Terminal Wire
- Speed Controller
- Power Supply
- List of Components
Track Assembly
- Decide where to set up your train – a dry, firm, flat surface works best!To
- make sure you have enough working room, make a test track layout by loosely placing track in desired configuration.
- The terminal/rerailer section will later be connected to a power pack and power supply, so place it near an outlet or power strip.In
- stall under-track magnet, if your set comes with one. If your set does not come with one, magnets are available separately (HO Item No. 78999; N Scale Item No. 78998).As
- semble the track by pushing together. Make sure the rail and joiners are seated properly. Be careful that the rail joiners do not slip under the rail without properly connecting. This can cause train derailments and electrical circuit interruptions.
- After track is assembled, double-check for joint connection and fit by lightly running your fingers over the top of the rails in both directions.If
- you detect bumps or distortion on the track surface, recheck the rail joiner fit.
Power Connections
- Power supply and speed control are plug and play; no tools are needed.
- Power is supplied to the track and the locomotive by the power supply, speed controller, terminal wire, and E-Z Track terminal/rerailer.
- First – turn knob on the speed controller counterclockwise until it stops (all the way to the left).
- Next – attach terminal wire to the speed controller by plugging it in where it says 'To Track'
- Then – plug terminal wire into the E-Z Track terminal rerailer. Firmly push connector onto the track terminals.
- Finally – plug the connecting wire from the power supply into jack on the speed controller labeled 'IN.' Then plug power supply into a live wall outlet.
- Some sets may come with a speed controller with two push button connectors. These are used to supply AC power to accessories.
- To make positive and secure connections to these, push in buttons and insert each of the bare ends of the connection wire from your accessory.
- The speed controller is capable of powering one accessory at a time.
Putting the Train on the Track
- Put the locomotive on the track and run the wheels back and forth over the terminal rerailer track.
- When the wheels glide smoothly over the track, you know the wheels are all on the track. If your set comes with a tender, attach it to the locomotive.
- Add the rest of the cars that come with your set by placing them on the track and running them back and forth over the terminal rerailer until they glide smoothly. Then gently push the cars together – they will engage automatically.
- Do not try to connect cars when positioned over an under-track magnet.
How to Use E-Z Mate Couplers (HO and On30 Scale)
- Your set may be equipped with E-Z Mate magnetically operated knuckle couplers that let you perform real railroad switching and yard operations.
- Coupling two cars with E-Z Mate couplers is as easy as pushing them together when they are not over an under-track magnet.
- Uncoupling occurs only when over an under-track magnet and when there is no tension between the cars.
- To uncouple E-Z Mate couplers, stop two couplers directly over the under-track magnet. With no tension between the cars, the couplers will open automatically.
- If cars will not couple, check to be sure cars are not positioned over the uncoupling magnet or parked on a curve.
- If cars will not uncouple, check to be sure the couplers are positioned directly adjacent to the magnet position indicator and that the indicator is placed in line with the center line of the under-track magnet.
- Check that the magnet is secured to the underside of the track and fitted with the steel plate provided.
How to Run Your Train
- Turn the knob on the speed controller clockwise until it stops (all the way to the left).
- Plug in the power supply.
- Begin feeding power to the track by slowly turning the knob on the speed controller clockwise.
- Observe the direction of your train.
- If it moves backwards when the controls indicate forward, stop the train.
- Then simply disconnect, flip, and reconnect the terminal wire to the terminal rerailer track.
- Remember – never leave your train running unattended!
Action Checklist (Troubleshooting If Your Train Doesn’t Run or Stops Running)
- Is the power supply plugged in to a live receptacle?
- Are the wheels on the track?
- Is the wiring secure?
- Is the track properly assembled?
- Is the track properly seated in the rail joiner?
- If your train stops or fails to start, a short circuit may be indicated. If this is the case, Unplug the power supply immediately.
- Common reasons for a short circuit: derailed wheels may cause a short. Check to make sure all wheels are on the track. Also check all connections and make sure there is no metal of any sort across the rails.
- After checking everything carefully, resume operation.
- Please note, your power supply is protected by a circuit breaker that automatically resets after a short circuit is corrected.
- Allow up to 5 minutes for the circuit breaker to reset before resuming operation.
Keep Your Train in Top Operating Condition
- Works better after couple hours of break-in time.
- Train performs best under clean operating conditions.
- Clean wheels and a clean track ensure good electrical contact.
- After about every 8 hours of operation, wipe the track rails and exposed wheels with a soft, lint-free cloth.
- Removal of black residue is normal.
- Do not use steel wool to clean your track.
- Do not use common solvents, they may damage plastics - use track cleaner.
- After 24 hours of use, light lubrication is required to keep train in top operating condition. Bachmann E-Z Lube or other hobby-grade lubricants are recommended.
Bachmann hopes you enjoy your train for many years to come!
Latest Reviews
View all
Warner Love Story Books
- Updated: 30.04.2021
- Read reviews
Raclette Grills
- Updated: 07.03.2021
- Read reviews

Cheese Servers
- Updated: 25.04.2021
- Read reviews

Intex Baby Swim Floats
- Updated: 04.07.2021
- Read reviews

Jawbone Fitness Tracker
- Updated: 18.02.2021
- Read reviews