13 best breadboard for the raspberry pi adafruit
A breadboard for the Raspberry Pi by Adafruit is likely an electronic prototyping accessory designed to be used in conjunction with a Raspberry Pi single-board computer. Here's what you should know about it:
Purpose: Breadboards are used for creating temporary circuits and prototypes without the need for soldering. They allow users to experiment with different electronic components, connections, and sensors, making them an essential tool for electronics hobbyists and engineers.
Compatibility: Adafruit, a well-known electronics manufacturer, may offer a breadboard specifically designed to work seamlessly with Raspberry Pi models. This means that the breadboard's size and pin layout are likely compatible with the GPIO (General Purpose Input/Output) pins on the Raspberry Pi, making it easy to connect and test various components.
GPIO Connectivity: Raspberry Pi boards have GPIO pins that can be used to interact with external sensors, displays, and other electronic components. A dedicated breadboard for the Raspberry Pi would likely have a connector or header that allows for easy access to these GPIO pins, simplifying the process of connecting and testing circuits.
Prototyping Space: Breadboards typically consist of a grid of holes where users can insert electronic components and connect them using jumper wires. The breadboard may also have labeled rows and columns to help users organize their circuits.
Versatility: Breadboards are versatile and can be used for a wide range of projects, from simple LED blinkers to more complex sensor-based applications.They are commonly used for experimenting with sensors, LEDs, resistors, capacitors, and other electronic components.
No Soldering Required: One of the key advantages of using a breadboard is that it eliminates the need for soldering, making it a beginner-friendly tool for electronics enthusiasts. Components can be easily inserted and removed from the breadboard as needed.
Project Tutorials: Adafruit may provide project tutorials and documentation that demonstrate how to use their specific breadboard with Raspberry Pi. These resources can be invaluable for individuals looking to start building electronics projects with their Raspberry Pi.
Additional Features: Depending on the specific Adafruit breadboard model, it may come with additional features such as power rails, integrated power supplies, or built-in test points to make prototyping more convenient.
In summary, a breadboard for the Raspberry Pi by Adafruit is likely a tool designed to simplify and enhance the process of prototyping electronic circuits and projects using a Raspberry Pi single-board computer. It allows users to experiment with different components and connections without the need for soldering, making it an essential accessory for electronics enthusiasts and hobbyists working with Raspberry Pi-based projects.
Below you can find our editor's choice of the best breadboard for the raspberry pi adafruit on the market
Adafruit Half-Size Perma-Proto Raspberry Pi Breadboard PCB Kit [ADA1148]
Product description
We put a PermaProto half sized proto board in a blender with a Pi Cobbler and out emerged this very tasty confection - the PermaProto for Pi! It has the Cobbler baked right in. Simply solder the 2x13 pin header in and you get all the labeled breakouts with tons of prototyping space, power rails, mounting holes and that gorgeous silk. Customers have asked us to carry basic perf-board, but we never liked the look of most basic perf: its always crummy quality, with pads that flake off and no labeling. Then we thought about how people actually prototype - usually starting with a solderless breadboard and then transferring the parts to a more permanent PCB. That's when we realized what people would really like is a proto board that makes it easy! This proto-board is the PCB you always wish you had, but never realized it! We took the basic layout of a half-sized breadboard (the PCB has 30 rows) and turned that into a beautiful PCB. The top side has a white silkscreen, and the same markings you're familiar with, to make transferring components easy. The bottom has the 5-hole pad design that matches a classic breadboard, with 4 power bus lines on the sides, and no mask so you can easily cut traces when necessary. We used 1.2mm diameter drill holes so even parts with big leads will fit. All holes are thru-plated for strength - these wont peel off with rework. The finish is a gold plate - you won't get oxidation like with bare copper perf! There are also tons of mounting holes so you can attach the PCB to your project box.

Adafruit Industries Pi T-Cobbler Breakout Kit for Raspberry Pi with GPIO Cable - Assembled!
Product description
Now that you've finally got your hands on a Raspberry Pi , you're probably itching to make some fun embedded computer projects with it. What you need is an assembled add on prototyping Pi T-Cobbler from Adafruit, which can break out all those tasty power, GPIO, I2C and SPI pins from the 26 pin header onto a solderless breadboard. This mini kit will make "cobbling together" prototypes with the Pi super easy. Designed for Raspberry Pi Model B Revision 1 or Revision 2. This assembled Cobbler is in a fancy T-shape, which is not as compact, but is a little easier to read the labels. We also have the more compact original Cobbler. The assembled Pi T-Cobbler mini kit comes with a 26 pin ribbon cable, and an already soldered T-Cobbler as shown. No soldering required! This mini kit comes fully assembled! The PCB and header come soldered together so you can plug the cable between the Pi computer and the T-Cobbler breakout. The T-Cobbler can plug into any solderless breadboard (or even a prototyping board like the PermaProto). The T-Cobbler PCB has all the pins labeled nicely so you can go forth and build circuits without keeping a pin-out printout at your desk. We think this will make it more fun to expand the Pi and build custom circuitry with it. The Adafruit Pi T-Cobbler is compatible with both versions 1 and 2 of the Raspberry Pi Computer - for version 2 computers, note that the GPIO #21 has been replaced with GPIO #27 and that the I2C pins are now I2C port #1 instead of #0. All other pins are the same. Please note, this product only contains a 26 pin ribbon cable, a custom PCB with ribbon cable socket and header pins soldered to it. The Raspberry Pi, breadboard, breadboarding wires, cables, components, case, power supply, etc is not included! We do stock many of those items in the shop, so check those out as well!
- Raspberry Pi Prototyping
- Hack your Raspberry Pi!
- Assembled!
User questions & answers
| Question: | has the packaging problem been addressed yet |
| Answer: | Did you ever find any 2004 displays with the EU character set ROM? |
| Question: | Will this work with Raspberry pi |
| Answer: | here's the libraries I use #include // Required Library #include // Required Library #include // Required Library LiquidCrystal_I2C lcd(0x27,2,1,0,4,5,6,7,3,POSITIVE); //Address for LCD |
| Question: | Is this for Raspberry Pi B+ or Regular |
| Answer: | Without knowing your project, it sounds like you need the display without the I2C interface. To use this display you would need to remove the I2C board that is soldered on the back of the 2004. There are displays available without the I2C in different sizes. Some of typically sizes are 2x8, 1x16, 2x16 and 4x20. They will work with a 8 bit or 4 bit data interface plus control lines. |

Adafruit 2028 Assembled Pi T-Cobbler Plus - GPIO Breakout for
Adafruit
Product description
Assembled Pi T-Cobbler Plus - GPIO Breakout for Raspberry Pi This is the assembled version of the Pi T-Cobbler Plus. It only works with the Raspberry Pi Model Zero, A+, B+, Pi 2,Pi 3! (Any Pi with 2x20 connector) The Raspberry Pi has landed on the Maker World like a 40-GPIO pinned, quad-USB ported, credit card sized bomb of DIY joy. Now is a good time to upgrade your set up and accessorize using all of the 40 pins. That's why we now carry the Adafruit's Assembled Pi T-Cobbler Plus (Breakout + Cable) for Raspberry Pi. This Cobbler is in a fancy T-shape, which is not as compact, but is a little easier to read the labels. The T-Cobbler Plus is an add on prototyping board specifically designed for the 2x20 connector-type Raspberry Pi and can break out all the power, GPIO, I2C and SPI pins from the 40-pin header onto a solderless breadboard. This set will make cobbling together prototypes with the Pi that much easier. Each order comes with a 40 pin ribbon cable and assembled T-Cobbler Plus. You can plug the 40-pin GPIO cable between the Pi computer and the T-Cobbler breakout. The T-Cobbler can plug into any solderless breadboard. The T-Cobbler PCB has all the pins labeled nicely so you can go forth and build circuits without keeping a pin-out printout at your desk. We think this will make it more fun to expand the Pi and build custom circuitry with it. Designed for use with any 2x20 connector Raspberry Pi. No soldering required! The Raspberry Pi, solderless breadboard, bread boarding wires, cables, components, power supply, etc are not included! We stock many of those items, so check those out as well! Specifications 73mm x 20mm x 11mm / 2.9 x 0.8 x 0.4 Height with pins: 19mm / 0.8 Width at top of T: 58mm / 2.3 Weight: 14g EagleCAD PCB files on GitHub Fritzing object in Adafruit Fritzing library . Made in China.
User questions & answers
| Question: | How long is the ribbon cable |
| Answer: | 5 volts dc |
| Question: | Does this fit the adafruit perma-proto pcb boards, too |
| Answer: | mine does |
| Question: | Is it zero compatible |
| Answer: | 3.91mm x 9.7mm. It raises 10mm from the pcb. |
| Question: | Does this work with raspberry Pi |
| Answer: | https://bitbucket.org/fmalpartida/new-liquidcrystal/downloads |

Adafruit PIR Motion Sensor
Adafruit
Product description
PIR sensors are used to detect motion from pets/humanoids from about 20 feet away (possibly works on zombies, not guaranteed). This one has an adjustable delay before firing (approx 2-4 seconds), adjustable sensitivity and we include a 1 foot (30 cm) cable with a socket so you can easily reposition the sensor or mount it using the two drills on either side Runs on 5V-16V power (if you need to run it off of 3V you can do that by bypassing the regulator, but that means doing a bit of soldering). Digital signal output is 3.3V high/low. Sensing range is about 7 meters (120 degree cone) There are many tutorial available on Adafruit's website for these sensors!
- Detect motion up to 7 meters away
- Perfect for Raspberry Pi or Arduino Projects
- Easy to use
- Requires soldering of header pins
User questions & answers
| Question: | Where is the sensor on this board and how big is it |
| Answer: | Can be used independently |
| Question: | Can I use two of these sensors to determine distance between them |
| Answer: | No |
| Question: | Does it come with the wire it shows in the picture? Some reviews make it seem like it may not |
| Answer: | I should think so. You just need a way of reading the values coming from the sensor to detect motion. |
| Question: | I am trying to get these to drive the coil on these relays, but its not a strong enough signal to trip them. What am I doing wrong |
| Answer: | Depends on the sensitivity setting. I have had no problems in the 2 to 3 meter range which is perfect for my uses. Also, this is an infrared sensor that senses motion, so if your surface is stationery, you might consider an ultrasonic sensor instead. |

kuman for Raspberry Pi 4B 3B+ Kit, 830 MB-102 Tie Points Solderless Breadboard + GPIO T Type Expansion Board + 65pcs Jumper Cables Wires+ 40pin Rainbow Ribbon Cable+100pcs Resistance K73
Product description
We are professional factory on making all electronics components based on Arduino and Raspberry Pi. And we also have professional engineer team to offer you tutorials which you can start from beginning.We are always caring about each customer’s experience and must improve the product function details at your suggestion.
This Breadboard Prototyping Starter Kit has components you need to start with a good prototyping base for your circuits.
High quality breadboard Compatible. 100% compatible with Raspberry Pi
NOTE: Power Supply is not included, Raspberry Pi is NOT INCLUDED
This is the assembled version.
Package Contents:
1pcsRainbow Ribbon Cable
1X GPIO T TypeExpansion Board
1pcs 830 MB-102 Tie Points Solderless Breadboard
65X Jumper Cable Wires
10 X10 ohm Resistors
10 X 100 ohm Resistors
10 X 200ohm Resistors
10 X330ohm Resistors
10X 1Kohm Resistors
10X 2KohmResistors
10X 5KohmResistors
10X 10KohmResistors
10X 100KohmResistors
10X 1m ohmResistors
- This is a updated Assembled kuman starter kit for for Raspberry Pi 3 Model B/ 2 B/B+ / RPI 1 A A+Zero
- High quality Solderless Breadboard: 830 tie-points 2 independent power rail sets in total Adhesive backing Solid construction
- 65pcs Jumper cable wires Kits: Male to Male jumper wires; 65 pieces several lengths options; Makes wiring a cinch; Many colors; Very flexible
- The GPIO expansion board is in a fancy T-shape, which is not as compact, but is a little easier to read the labels
- Detailed tutorials including project introduction and source code CAN BE PROVIDED, let us know if you need it.
User questions & answers
| Question: | In the picture the breadboard rows don't match the pin slots and the column labels are inverted. Is this the breadboard that is shipped with the kit |
| Answer: | You can add a touch screen and build an android auto system. Lots of info on it. Just google |
| Question: | I am trying to connect the ribben cable to my rpi 3b. should the cables go across the pi or away from the pi |
| Answer: | Hello, I contacted Raspberry.org and they suggested not to use the large heatsink that comes with these kits on the new tin covered Broadcom BCM2837B0 chip on the Raspberry Pi 3 ModelB+. Seems like that would be mentioned in the specs, but it is not mentioned at all, which led me to contact them directly. Enjoy and good luck!! ~mk |
| Question: | Does this fit the 3b+ model |
| Answer: | Not the standard desktop version of windows 10. But please look at Windows 10 "IoT Core". You'll find a download link for it on the official raspberrypi.org website. |
| Question: | Does this work with the pi zero |
| Answer: | Can it run on a blackberry and us this next gen bkackberry. Where’s the keyboard and can it run a modem for compuserve access? |
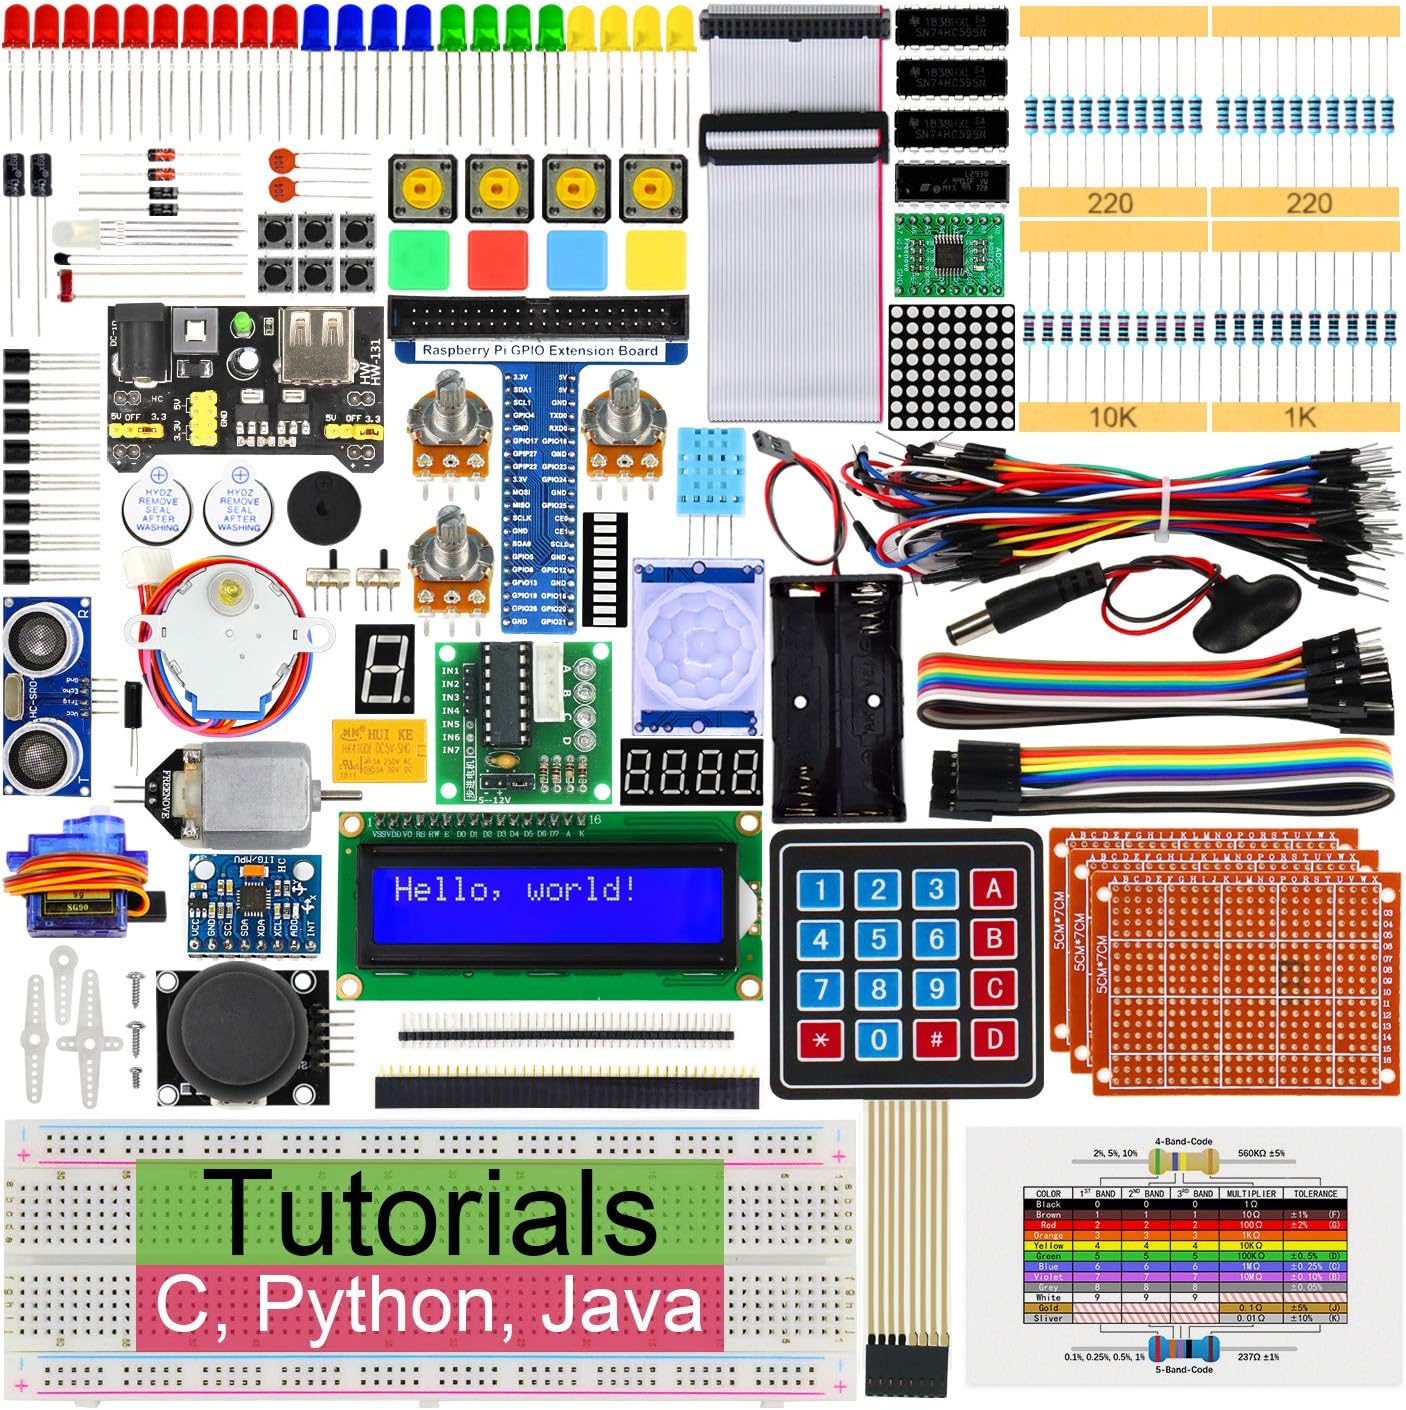
Freenove Ultimate Starter Kit for Raspberry Pi 4 B 3 B+ 400, 434-Page Detailed Tutorials, Python C Java Code, 223 Items, 57 Projects, Solderless Breadboard
Freenove
Product description
Important Notes:
This kit DOES NOT contain Raspberry Pi.
Supported Models:
Recommended:
Raspberry Pi 400 / 4B / 3B+ / 3B
Also compatible:
Raspberry Pi 3A+ / 2B / 1B+ / 1A+ / Zero W / Zero
Tutorials and Code:
Come with 2 detailed tutorials (download needed, no paper tutorial).
One (Tutorial.pdf) uses C and Python, the other (Processing.pdf) uses Java.
You can download them before purchasing:
https://git.io/fjgTR
Contents of Tutorial.pdf:
Preface
Raspberry Pi
Install the System
Chapter 0 Preparation
Component List
Optional Components
Raspbian System
Remote desktop & VNC
Chapter 1 LED
Project 1.1 Blink
...
(Download tutorial for details)
...
Chapter 26 WebIOPi & IOT
Project 26.1 Remote LED
Chapter 27 Solder Circuit Board
Project 27.1 Solder a Buzzer
Project 27.2 Solder a Flowing Water Light
What's next?
Contents of Processing.pdf:
Preface
Install Processing Software
First Use
Chapter 1 LED
Project 1.1 Blink
Project 1.2 MouseLED
Chapter 2 LEDBar Graph
Project 2.1 FollowLight
...
(Download tutorial for details)
...
Chapter 18 Infrared Motion Sensor
Project 18.1 Sense LED
App 1 Oscilloscope
App 1.1 Oscilloscope
...
(Download tutorial for details)
...
App 5 Tetris Game
App 5.1 Tetris Game
What's next?
- 3 programing languages -> C, Python (compatible with 2&3) and Java.
- 434-page detailed tutorials (including basic electronics knowledge) -> The download link can be found on the product box. (No paper tutorial.)
- 223 items for 57 interesting projects -> Each project has a circuit diagram and tested code with detailed explanation.
- Compatible models -> Raspberry Pi 400 / 4B / 3B+ / 3B / 3A+ / 2B / 1B+ / 1A+ / Zero W / Zero. (NOT contained in this kit)
- Get support -> Our technical support team is always ready to answer your questions.
User questions & answers
| Question: | are there any tutorials for how to connect everything?? Not looking for coding tutorials yet |
| Answer: | Dear customer, Thank you for your question. You can download tutorial first via link below: https://github.com/Freenove/Freenove_Ultimate_Starter_Kit_for_Raspberry_Pi/archive/master.zip If you have any concerns, please feel free to contact us via Freenove support email. Best Regards, Freenove Support Team |
| Question: | Issues with the i2c module:the instructions you give in the tutorial are outdated and not applicable to the rpi3 and python3 - any suggestions |
| Answer: | Dear customer, We have update our tutorial(i2c configure) and code(Python) for customers. Now all Python code can run on Python 2 and Python 3. Please download again. Thanks for your question. Kind Regards, Freenove |
| Question: | Does it work with raspberry pi |
| Answer: | Dear customer, Yes, we have tested all projects in our tutorial . This kit works well with Raspberry Pi 4. And if you have any concerns, we offer technical support. Sincerely, Freenove Support Team |
| Question: | Are three 74HC595's used in one project? I broke one since the pins were ripped by me pulling it out of the breadboard too hard |
| Answer: | Dear customer, Thank you for choosing Freenove. I am sorry for the inconvenience. No, there is no project using three this chips. There just is a project using two this chips. If you broke more chips, you can contact us at [email protected] We will send you a new one for free. So don't worry. Sincerely, Freenove Support Team |

KNACRO 4-Channel 16Bit ADC with PGA for RPI Raspberry PI 16 Bits I2C ADS1115 Module ADC 4 Channel for Raspberry Pi 3/2 Model B/B+
Product description
Here comes the perfect solution for adding a VGA screen to your Raspberry Pi.
What is better, it is so much cheaper than an HDMI to VGA adapter.
This VGA connection is driven natively in hardware over the GPIO pins using a parallel interface and it takes around the same CPU load as the HDMI connection on board.
It is capable of displaying 1080P VGA video with zero CPU load.
You may drive this interface with the HDMI connection at the same time to even set up dual screens.
Specifications:
Compatible with Raspberry Pi 3/2/B+/A+ The VGA output supports resolution: from 640 x 480 up to 1920 x 1024 at 60fps.
With 6 bits per channel you have a maximum of 262144 colours.
Dimension: 64.00mm * 32.3mm
Weight: 16.5g
Features:
Easy to Set Up Easy to Configure Technology Support:
Edit /boot/config.txt file with vim.tiny or other editor. and modify as following: framebuffer_width=800 framebuffer_height=600 dpi_group=2 device_tree=bcm2710-rpi-3-b.dtb dpi_mode=86 dtparam=i2c_arm=off dtparam=spi=off dtparam=uart0=off dtparam=uart1=off dtoverlay=pi3-disable-bt-overlay dtoverlay=vga666 enable_dpi_lcd=1 display_default_lcd=1 force_pwm_open=0 dtparam=audio=on start_x=1 gpu_mem=128 Please disable the functions of all the GPIO Pins so that it can work properly 800*600 resolution is highly recommended as higher resolution will slow down your Pi and cost more RAM
Package Included:
1 * Raspberry PI 16 Bits I2C ADS1115 Module
- The ADS1115 are precision analog-to-digital converters (ADCs) with 16 bits of resolution offered in an ultra-small, an MSOP-10 package.
- Data are transferred via an I2C-compatible serial interface, four I2C slave addresses can be selected, it operate from a single power supply at 3.3V.
- It can be used to detect analog signal and convert it to digital signal.
- You can attach a joy stick or other analog sensor such as NTC,temperature, dust sensor and so on.
User questions & answers
| Question: | Are the 3.3v and gnd already pre-wired from the pi's gpio pins, or do i need separate wiring for that |
| Answer: | I bought this exact unit for use with my Raspberry Pi 3. Found a circuitry plan and python code here. http://www.raspberrypi-spy.co.uk/2012/08/20x4-lcd-module-control-using-python/#prettyPhoto and soldered everything up over a weekend. |
| Question: | Chn0 reads as Chn1 and Chn3 reads as Chn0 is it wired wrong or is it the software |
| Answer: | Manufacturer's website, not Rio Rand, is Qin Gen Electronics. www.qc-lcd.com. But you are better off just googling hd44780 because it is the control chip used in virtually all character matrix lcds. Lots of info on the web. |
| Question: | Since this is powered by the 3.3v pin and not the 5v pin can it read voltages higher than |
| Answer: | Yes, you can run the backlight through the Arduino power. The best thing to do is use one of your digital pins to control the backlight. Toggle the pin high and low to switch backlight on and off. Seems a bit of a power hog to me, and uses several pins. I would opt for a small I2C OLED display. you only need 2 pins beside power and gnu, plus it is very low power consumption, and despite size it's just as readable as 20x4. |
| Question: | I was noticing the api mentioned is for python but i need to read voltages from node.js is this supported |
| Answer: | Yes, you can run multiple devices on a 12c bus, because each device has a unique address. |

Kuman RPi GPIO Breakout Expansion Board + Ribbon Cable + Assembled T Type GPIO Adapter 20cm FC40 40pin Flat Ribbon Cable for Raspberry Pi 3 2 Model B & B+ SC05
Product description
Specifically designed for Raspberry pi 3B, Raspberry pi 2B, Raspberry pi 1B+, Raspberry pi 1A+, Raspberry pi zero W, Raspberry pi zero Can break out all those tasty power, GPIO, I2C and SPI pins from the 40-pin header onto a solderless breadboard Each order comes with a 40 pin ribbon cable and assembled T Type Plus GPIO Expansion Board. You can plug the 40-pin GPIO cable between the Pi computer and the T Type Plus GPIO expansion board This GPIO expansion board is in a fancy T-shape, which is not as compact, but is a little easier to read the labels This is the assembled version. Packing included: 1pcs GPIO 40P Breakout Board For Raspberry Pi 2 Mode B And B+ 1pcs 20cm FC40 40pin Flat Rainbow Ribbon Cable NOTE: Raspberry Pi development board is not included.
- Assembled RPI GPIO with 8" 40 pin ribbon cable for Raspberry Pi 3B, Raspberry Pi 2 model B, Raspberry Pi 1B+, Raspberry Pi 1a+, Raspberry Pi zero w, Raspberry Pi zero
- 1*Gpio 40P 40-Pin rainbow ribbon cable
- 1*Gpio expansion board
- 40 pins are labeled for easy prototyping
- Gpio adapter plus for Raspberry Pi B+, Raspberry Pi 2, Raspberry Pi is not included
User questions & answers
| Question: | Does this also work with the RPi |
| Answer: | Websites like circuitbasics.com and instructables.com, as well as adafruit.com have LCD libraries that will work with this I2C device and your Arduino Mega. |
| Question: | Does this also work with the RPi |
| Answer: | It should work fine with Teensy 3.2. I'm using one of these displays with an Uno...and have used Uno code on the Teensy 3.2 with the most minor of modifications and it works fine. As KQ2P notes, these address on these is 0x3F. If the I2C finder doesn't report an address, you may have a defective unit. |
| Question: | Does each pin on the 40 pin connector go to a single pin on the breadboard connectors? And the grounds are not connected together |
| Answer: | I could only get it to work with fmalpartida "New LiquidCrystal" library from here. https://bitbucket.org/fmalpartida/new-liquidcrystal/wiki/HomeThe address and wiring is:#define I2C_ADDR 0x3FandLiquidCrystal_I2C lcd(0x3F, 2, 1, 0, 4, 5, 6, 7, 3, POSITIVE); |
| Question: | Does the breakout board come soldered or would I have to do that myself |
| Answer: | Here's what I did: I soldered this header onto the module: 5pcs 1x40 Pin 2.54 mm Angle Single Row Pin Header Strip (just break off the number of pins that you need.) Then I plugged in a cable strip from either this: Phantom YoYo 40P dupont cable 200mm male to female, or this: RioRand 3 x 40P 20cm Dupont Wire Jumper Cable 2.54 1P-1P Male-Male/Female-Female/Female-Male. These are all sold on Amazon. Works beautifully. One warning: the wires in the cable strip are very fine and a little difficult to work with if you can't use the pins that are already attached and have to strip insulation and re-solder. |

kuman RPi GPIO Breakout Expansion Kit for Raspberry Pi, T-Type Expansion Board + 400 Points Tie Points Solderless Breadboard + 40 pin IDE Male - Female - Male Extension Cable + 35pcs Jump Wires K80
Product description
Product description:
Suitable for Raspberry pi 3B ,Raspberry pi 2 Model B 2B,Raspberry pi 1B+, Raspberry pi 1 A A+,Raspberry pi zero W, Raspberry pi zero and 3.5 inch LCD Panel.
1,The SPI mode of the display is extended, so that the fan on the shell can be installed easily, at the same time you can use the extra GPIO.
2, It is easy to connect the GPIOs Products those are not used on the screen.
3, T-type expansion board and breadboard makes the experiment more convenient
4, It solve the problem that we can not use GPIO.
Packing included:
1 pcs T-type expansion board
1 pcs 400 points breadboard
40 pin IDE male - female - male extension line
30 pcs Bread board line
NOTE: Raspberry Pi development board is not included.With the GPIO extention board, you can connect all version raspberry of the board to various sensors and electronic components.
T type GPIO board blue and red will be shipped randomly
- Essential kit specially designed for using the gpio pins of raspberry pi motherboard to plug 3.5inch LCD panel and other components at the same time.
- T-type expansion board and breadboard makes the experiment more convenient
- Comes with a 40 pin IDE male - female - male extension line and 30 pcs Bread board Jump Cables, 1 pcs T-type expansion board , 1 pcs 400 points Points MB102 breadboard
- With the GPIO extention board, you can connect all version raspberry of the board to various sensors and electronic components.
- Detailed tutorials including project introduction and source code CAN BE PROVIDED, let us know if you need it.
User questions & answers
| Question: | Does it work with a Kano computer with Raspberry Pi |
| Answer: | Yes we have. Pls refer to the following link: https://mega.nz/#!bugkUSZI!H7narbMYp0HFww1ekUMH5HkpcMcIINKBkPJeLl9g5_0 |

kuman 120pcs Breadboard Jumper Wires for Arduino Raspberry Pi 3 40pin Male to Female, 40pin Male to Male, 40pin Female to Female Ribbon Cables Kit Multicolored Pack K45
Kuman
Product description
Description
The item is a set of 120pcs 20cm 40pin jumper wires, and are made of high-grade copper wire material for safe and durable to use.
Features:
3pcs×40-pin Multicolored breadboard dupont jumer wires in one packaging will be sold together.
100% brand new and high quality 20cm Multicolored 40-pin Breadboard Jumper Wires Ribbon Cables.
Material: high-grade copper wire.Durable and reusable
Portable design, easy and safe to use.
Color: as shown in the pictures.
The cables can be separated to form an assembly containing the number of wires you require for your connection and to support non-standard odd-spaced headers.
Portable design, easy and safe to use.
Specification:
Each cable length: about 20cm /8-inch.
The male ends meant for insertion into standard 0.1 quot;
(2.54mm) female sockets and the female ends are meant for insertion onto standard 0.1 quot;
(2.54mm) male headers.
Including : 40-pin male to female jumper wires + 40-pin male to male cable + 40-pin female to female cable =120pcs in total
Package includes:
1× 20cm Multicolored 40-pin Male to Female Breadboard Jumper Wires Ribbon Cable
1×20cm Multicolored 40-pin Male to Male Breadboard Jumper Wires Ribbon Cable
1×20cm Multicolored 40-pin Female to Female Breadboard Jumper Wires Ribbon Cable
- Including : 40-pin male to female jumper wires + 40-pin male to male cable + 40-pin female to female cable =120pcs in total
- Each cable length: about 20cm /8-inch.
- The male ends meant for insertion into standard 0.1"(2.54mm) female sockets and the female ends are meant for insertion onto standard 0.1"(2.54mm) male headers
- The cables can be separated to form an assembly containing the number of wires you require for your connection and to support non-standard odd-spaced headers.
- Made of high-grade copper wire material for safe and durable to use
User questions & answers
| Question: | Is this the same as a gpio wire |
| Answer: | No .. the rasperry pi 2 has additional pinouts. This is for a rasperry pi 1. Best to get "Assembled RPi GPIO T-Cobbler Plus with 8" 40 Pin Ribbon Cable for Raspberry Pi 2 and B+ A+" which can be found on amazon. |
| Question: | Can you cut the ends and solder to a circuit board |
| Answer: | This kit works on the original Raspberry Pi and will not work on the B+. |
| Question: | What's the AWG |
| Answer: | You can find other similar LCD displays that do not have the I2C module attached. |

CanaKit Raspberry Pi 3 B+ (B Plus) Ultimate Starter Kit (32 GB Edition, Clear Case)
CanaKit
Product description
NOTE: The 32 GB MicroSD card may appear as 1 GB when inserted into a PC as it is pre-partitioned. The remaining space can be expanded as desired.
The CanaKit Raspberry Pi 3 B+ (B Plus) Kit is covered by CanaKit's 1-Year Manufacturer Warranty offering hassle-free replacements.
The Ultimate Starter Kit includes everything in the Starter Kit plus all the electronic components needed to start using the GPIO port of the Raspberry Pi 3.
The kit includes a Raspberry Pi 3 case as well as the recommended Raspberry Pi 32 GB Class 10 MicroSD Card pre-loaded with NOOBS. Just Plug and Play!
The included CanaKit 2.5A Micro USB power supply (UL Listed) is specially designed and tested for the Raspberry Pi 3 B+. This power supply incorporates a noise filter to provide the highest stability.
Kit Includes:
- Includes Made in UK Raspberry Pi 3 B+ (B plus) with 1.4 GHz 64-bit Quad-Core Processor, 1 GB RAM, Dual band 2.4GHz and 5GHz IEEE 802.11.b/g/n/ac wireless LAN, Enhanced Ethernet Capability
- 32 GB Micro SD Card (Class 10) pre-loaded with NOOBS, CanaKit 2.5A Power Supply with 5 feet Micro USB Cable and Noise Filter (UL Listed)
- High Quality Raspberry Pi 3 Case, Premium Quality 6.5 feet HDMI Cable, Heat Sink, CanaKit Full Color Quick-Start Guide
- CanaKit GPIO to Breadboard Interface Board, Ribbon Cable, Large Breadboard, Jumper Wires, GPIO and Resistor Colors Quick Reference Cards
- RGB LED, 8 x LEDs (Blue/Red/Yellow/Green), 15 x Resistors, 2 x Push Button Switches
User questions & answers
| Question: | what are monitor and keyboard for raspberry pi 3 B |
| Answer: | Yes, it comes with raspberrian, which is basic and lightweight. It will get you started and help you learn the device pretty well |
| Question: | When will this be "prime" eligible? and also will the clear case shown here leave room for the poe hat when it is released by raspberry pi foundation |
| Answer: | Hello, the use of the cable is one side inserted in the raspberry pie, the other side is inserted on the T-type expansion board, and the T-type expansion board is inserted on the breadboard, as shown in the link figure. https://mega.nz/#!GIFADISY!nCArj3vP8T2_yPiMBMoaVCF11-vFkKqWR5bNSnkLpo8 . sometimes the system may delivered this Q&A delayed to us, any problem, you also could contact us by email([email protected]), we will reply to you in 24 hours, thanks for purchasing kuman Raspberry Pi Holder Breadboard Kit. |
| Question: | Does this come with any educational exercises / labs |
| Answer: | yes, it include 830-Point Breadboard, please kindly note,any problem, you also could contact us by email([email protected]), we are always here for you, thanks for supporting kuman Raspberry Pi Holder Breadboard Kit |
| Question: | Is the micro sd card included with this kit EVO+ version |
| Answer: | Yes, it can work with 3b+ |

EDGELEC 120pcs Breadboard Jumper Wires 10cm 15cm 20cm 30cm 40cm 50cm 100cm Wire Length Optional Dupont Cable Assorted Kit Male to Female Male to Male Female to Female Multicolored Ribbon Cables
Product description
Package include: 20cm (7.9inch) / 40pin Female to Female jumper wires / 40pin Male to Female jumper wires / 40pin Male to Male jumper wires (Total 120pcs)
- Package include: 20cm (7.9inch) / 40pin Female to Female jumper wires / 40pin Male to Female jumper wires / 40pin Male to Male jumper wires (Total 120pcs)
- Connector Type: Standard 2.54mm pitch dupont housing connector / 1pin-1pin
- Cable length: 20cm (7.9 inch) / Cable material: 12-core pure copper wire
- Cable features: Separable multicolored (10 colors) softness ribbon cables
- For DIY experiment / Electronic projects / Breadboard / PC motherboard / PCB project
User questions & answers
| Question: | Has anyone used these wires with a flirc case on their raspberry pi |
| Answer: | Size up! It ran very small. |
| Question: | Can the male pin be removed so that it is female |
| Answer: | I would say xl |
| Question: | How many amps can they handle |
| Answer: | The neck is wide enough that I don't need to undo the button. Super easy to slide off. |
| Question: | What is the awg |
| Answer: | Not sure, but this item has spandex for sure. It’s very stretchy and the fabric is breathable, so if I had to guess, I would go with the cotton/spandex. |

CanaKit Raspberry Pi GPIO Breakout Board Bundle
Product description
CanaKit RaspbNote: Raspberry Pi board is not included.
An exclusive bundle from CanaKit to start creating fun electronic projects with your Raspberry Pi using the GPIO interface.
This board is fully assembled and therefore soldering is not required.
This kit includes:
- CanaKit GPIO to Breadboard Interface Board
- GPIO Ribbon Cable
- GPIO Quick Reference Cards
- Breadboard
- RGB LED
- 32 x Jumper Wires(M/M)
- 2 x Red LEDs
- 2 x Green LEDs
- 2 x Yellow LEDs
- 2 x Blue LEDs
- 2 x Push Button Switches
- 15 x Resistors
This product is compatible with any Raspberry Pi containing a 40 Pin GPIO connector such as the Raspberry Pi 3. erry Pi GPIO Breakout Board Bundle
- Includes CanaKit 40-Pin GPIO Breakout Board and Ribbon Cable
- Includes Breadboard and Jumper Wires (M/M)
- Includes RGB LED, 8 x LEDs (Blue/Red/Yellow/Green), 15 x Resistors, 2 x Push Button Switches, CanaKit General Guide for Beginners to Electronic Component
- Includes Quick Reference Card for reference to the GPIO pins
- Compatible with the Raspberry Pi 2 and Raspberry Pi 3
User questions & answers
| Question: | Since the pins are the same as a rpi zero w, my hope is that this will work with a rpi zero w. can anyone confirm |
| Answer: | Just a converter from 240 to 110 |
| Question: | Does this fit the model 3b |
| Answer: | This is a maker product. both his LT and Chrome book are more powerful and versatile than this device most likely. IT is not best suited for day to day Desktop productivity. If your child wants to learn how to program and interphase with DIY hardware projects there is nothing better for them. The community that supports the Rpi is amazing. Go to there page (https://www.raspberrypi.org/about/)and you will see that it is all about creating hardware-software projects. I make retro arcade systems and robotic projects and others as a hobby. |
| Question: | Does the "canakit raspberry pi gpio breakout board bundle" work with the new raspberry pi |
| Answer: | Simply put, no standard Raspberry Pi has a RTC. The new "Pi 4 Compute module" *will* have a RTC. ASSUMING you run the Pi on a network, the "NTP" service addresses accurate clock needs, by checking with NTP hosts and updating your clock to correct for periodic drift. If you run your Pi WITHOUT A NETWORK then it is more challenging to maintain time -- but you can either purchase a RTC module, OR a GPS module. Both of these will provide accurate time references to the Pi. |
| Question: | Curious as to why it is a 40-pin set and they show a 20-pin ribbon cable |
| Answer: | Mine responded with Hardware : BCM2835 Revision : c03112 Serial : xxxxxx Model : Raspberry Pi 4 Model B Rev 1.2 so the answer is yes |
Latest Reviews
View all
Under Armours
- Updated: 27.07.2023
- Read reviews

Avengers 3D Backpacks
- Updated: 02.07.2023
- Read reviews

Talking Tables Teapot
- Updated: 31.05.2023
- Read reviews

Phone Bluetooths
- Updated: 30.06.2023
- Read reviews

Ultra Tampons
- Updated: 01.02.2023
- Read reviews